How to add a DNS record on cPanel, Namecheap.com
29-05-2024 - cPanel, Guides, NameCheap.comAn introduction on how to add a DNS record on cPanel, with Namecheap.com
Navigating the world of website setup can often feel overwhelming, especially when you’re confronted with a multitude of technical terms and configurations. Among these, DNS (Domain Name System) stands out as a crucial component that you will inevitably encounter. Whether you’re setting up a WordPress site or transferring your domain to a new hosting provider, understanding DNS is essential – and one common task you might need to perform is adding DNS records.
In this blog, we will guide you through the process of how to add a DNS record on cPanel, within your Namecheap.com account, cPanel is a widely-used web hosting control panel that simplifies many aspects of website management, including DNS configurations.
DNS overview
DNS serves as the phonebook of the internet, translating human-friendly domain names like “example.com” into IP addresses that computers use to identify and communicate with each other. Without DNS, you would need to remember complex numerical IP addresses for every website you want to visit, which would make navigating the web far less intuitive.
But why do you need DNS? First and foremost, DNS ensures that visitors can find your website easily. When someone types your domain name into their browser, DNS servers quickly match that name with the corresponding IP address, directing the user to your site. This seamless translation process is vital for maintaining a user-friendly internet experience.
Moreover, DNS plays a pivotal role in the functionality and accessibility of various internet services, including email and web hosting. For example, specific DNS records like MX (Mail Exchange) records are essential for routing emails correctly to your mail server. Similarly, A records and CNAME records are fundamental for pointing your domain to the server hosting your website’s files.
On platforms like Namecheap.com, understanding how to add a DNS record on cPanel allows you to take full control of these critical aspects. Whether you’re adding new records to link subdomains or updating existing ones

Adding DNS Records on cPanel with your Namecheap account
This guide is here to help those who’ve bought their domain and web hosting from Namecheap.com and need to add DNS records through cPanel. If the thought of dealing with DNS settings feels overwhelming, don’t worry—we’ve got you covered.
We’ll walk you through every step, from accessing your cPanel account via Namecheap’s dashboard to finding the DNS settings and adding different types of records like A, CNAME, and MX. Whether you’re setting up a new site, configuring email services, or integrating other tools, knowing how to handle DNS records is key to keeping everything running smoothly.
Step 1 – Go to Namecheap.com and Sign in
Start by heading over to namecheap.com.
Then hover over the “Sign in” link at the top of the navigation bar at the top of your screen and a login form will appear.


Step 2 – Fill out the login form
Now enter you login details and click on the “Sign in” button to log in to your Namecheap account.
On successful authentication, you’ll be redirected to your Dashboard – here you can manage all your Namecheap services (ie Domains, Hosting, Emails, etc).
Step 3 – Go to Hosting List
Now go to your Hosting List Page by clicking on the “Hosting List” menu in the left side.


Step 4 – Locate your domain and click “Go to cPanel”
On the Hosting List Page, you should see a list of the hosting services you’ve purchased on namecheap, find the one corresponds to the domain name that you want to change/add/delete a DNS record for.
When you located the domain, click on the “Go To Cpanel” button in the right side of the row, to log in to your Cpanel dashboard.
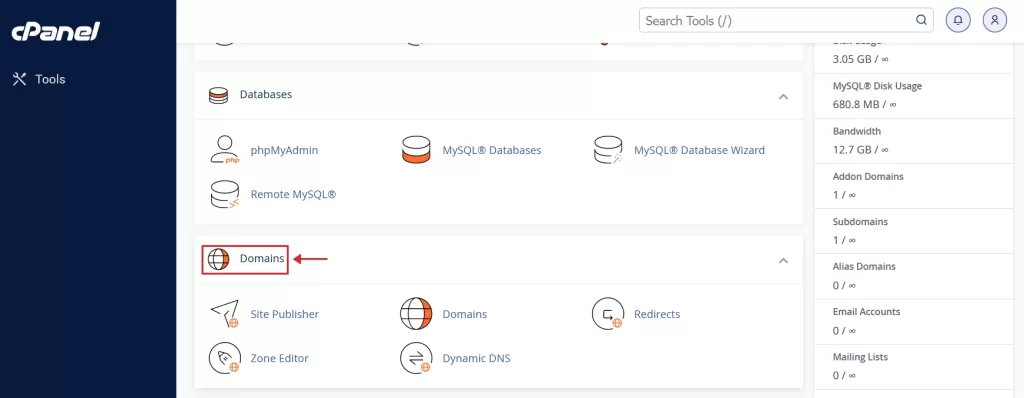
Step 5 – Scroll down to the “Domains” Section
You should now in your cPanel dashboard, from here – you wanna scroll down to section called “Domains”
Step 6 – Find and click on “Zone Editor”
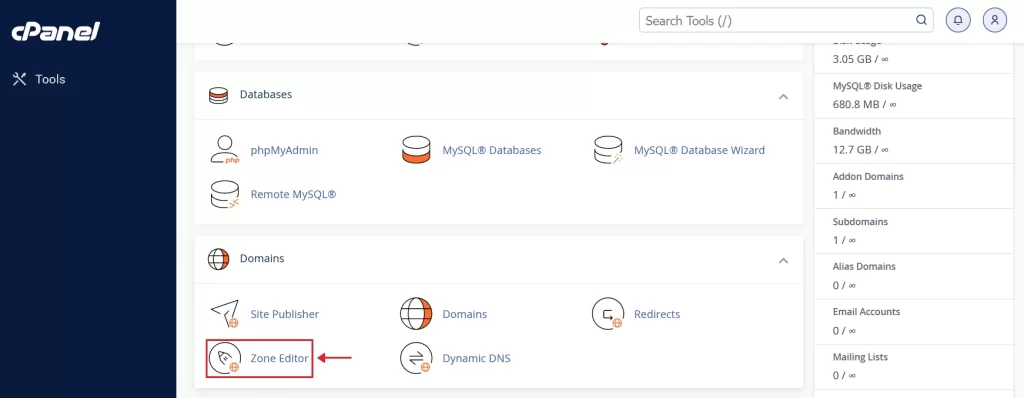
In the “Domains” section, you wanna locate “Zone Editor”, and click it.
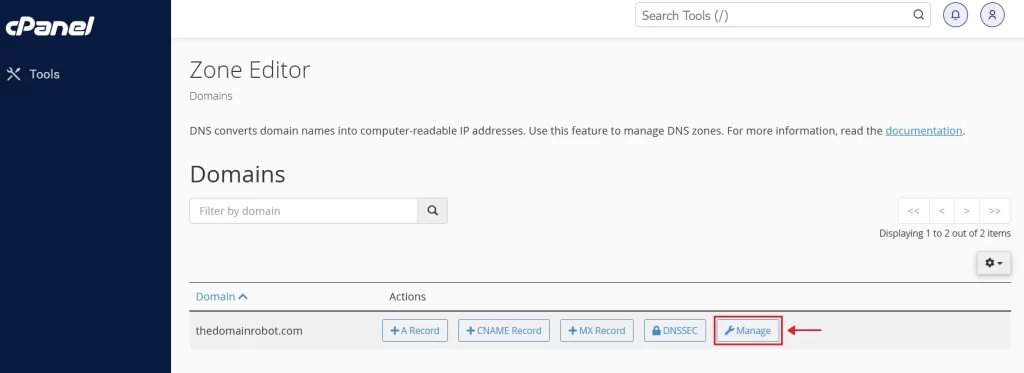
Step 7 – Locate your domain in the “Zone Editor”
In the “Zone Editor” you should be able to see a list of all your domains – locate the domain you wish to change/add/delete a DNS record for, and press “Manage” in the right side
Step 8 – Add a Record
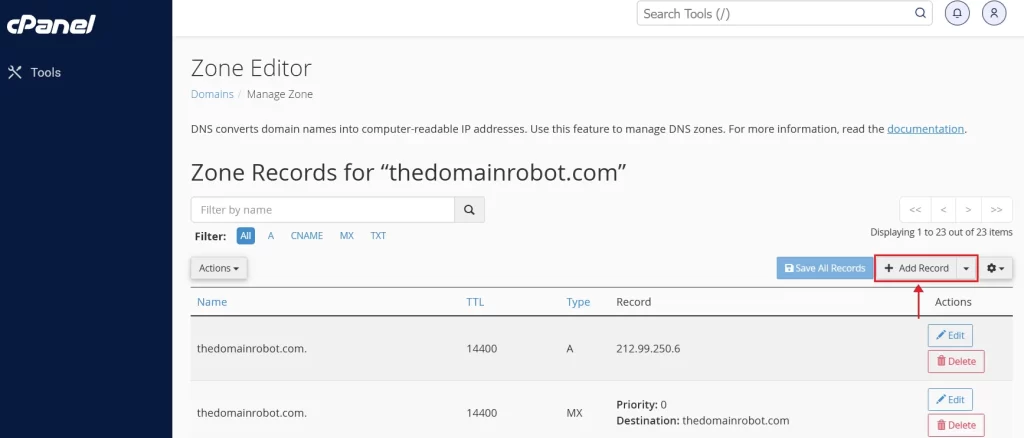
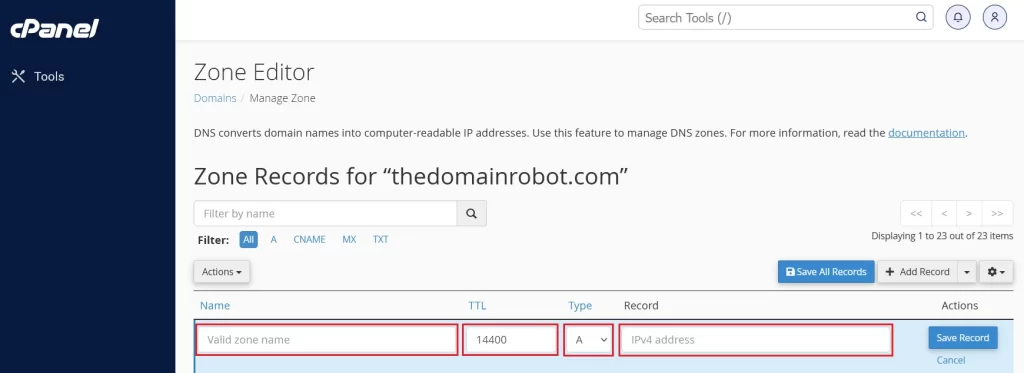
You should now be in the DNS panel/editor for your choosen domain. From here you wanna find the button “Add Record” – and click it.
Step 9 – Fill in the DNS record information
A new line should appear, and here you wanna fill in the DNS record information.
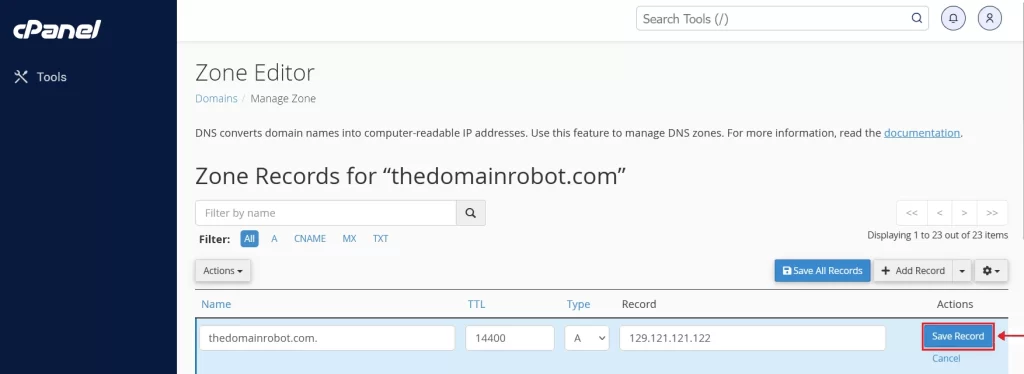
Step 10 – Save your DNS record
When done filling in all the nessecary DNS information simply press the blue “Save Record” button – and you are now done.
Your new record is now created, but will most likely take a little while to be put into effect. Normally it takes about 30 minutes, but can also take up to 48 hours – so be patient.
