How to Force HTTPS using .htaccess file
01-06-2024 - General, Guides, htaccessAn introduction on how to force HTTPS using .htaccess
Security and trust are critical elements for the success of any website. To elevate your site’s security and build credibility with visitors, ensuring your website is accessible via an HTTPS connection is paramount. HTTPS encrypts the data transferred between the user’s browser and your web server, safeguarding sensitive information from potential threats. This is particularly vital in an age where cyber threats are ever-present and user data protection is a priority.
One significant benefit of HTTPS is that it enhances user trust. When visitors see that your website is secure, indicated by the padlock icon in their browser, they are more likely to feel confident interacting with your site. This trust can lead to increased engagement, longer session durations, and higher conversion rates. A secure connection fosters a sense of safety, encouraging users to share personal information and complete transactions without hesitation.
Additionally, HTTPS can positively impact your website’s SEO rankings. Search engines like Google prioritize secure websites, and sites without HTTPS may be penalized in search results. This can lead to reduced visibility and lower organic traffic. By using HTTPS, you not only protect your users but also signal to search engines that your site is trustworthy and legitimate.
Understanding how to force HTTPS using .htaccess file is essential for ensuring that all traffic to your site is secure. While there are many ways to enforce HTTPS, utilizing the .htaccess file is a straightforward and effective method. This technique allows you to automatically redirect all HTTP traffic to HTTPS, maintaining a consistent and secure user experience across your website.

Understanding HTTPS
HTTPS stands for Hyper-Text Transfer Protocol Secure – and is a upgraded version of the HTTP protocol, but with added security. HTTPS uses the SSL/TLS protocols to encrypt data, protecting it from individuals with malicious intent. HTTPS encrypts the data exchanged between the server and the client (end-to-end encryption), making it much harder for anyone to intercept or tamper with the data in transit.
When you see a padlock icon in the browser’s address bar, next to the URL of the website – that means that the website is using HTTPS. Most modern browsers today will warn you when you try to access a website that isn’t secured with HTTPS.
Why Force HTTPS with the .htaccess file?
If you bought a domain and a hosting, chances are that your hosting provider installed an SSL certificate for your domain, in which case your domain should have HTTPS activated, but that isn’t always the case, and even if you have HTTPS activated, users may still be sent to the unsecure version of your website by default. This means that when your visitors go to your website, they’re met with the HTTP version and manually have to type in your website domain with a HTTPS prefix to access the secure version of your website i.e https://yourdomain.com, as you can see, this doesn’t give a very good user experience.
By forcing HTTPS with a .htaccess redirect, you make sure that whenever a user types in your domain, they’re automatically sent to the secure version of your website, even if they decide to type in http://yourdomain.com, they’ll be redirected to the HTTPS version.
Forcing HTTPS on your website has its benefits
Security
Protects sensitive data, such as login credentials and personal information.
SEO
Search engines like Google favor HTTPS sites, giving them a ranking boost.
Trust
Users are more likely to trust and engage with websites that show the secure padlock icon.
Compliance
Some industries and regulations require the use of HTTPS for data protection.
Before diving into how to force HTTPS usin .htaccess, it’s essential to have an SSL certificate installed on your site. An SSL certificate encrypts data between the user’s browser and your web server, ensuring secure cdommunication. One of the most common SSL certificates in use today is the “Let’s Encrypt” certificate. This certificate is widely favored because it is both free and very easy to set up. Installing a Let’s Encrypt certificate is a straightforward process that even those with limited technical expertise can manage. Without an SSL certificate, efforts to force HTTPS using .htaccess will be futile, as the HTTPS protocol requires this certificate to establish a secure connection. Therefore, before you proceed with configuring your .htaccess file to enforce HTTPS, make sure your website is equipped with a valid SSL certificate like Let’s Encrypt. This foundational step is crucial for securing your website effectively.
Step 1 – Access Your Server
Firstly, you need access to your website’s server files. Typically, you can do this via FTP (File Transfer Protocol) or through your web hosting control panel.


Step 2 – Create or Edit .htaccess File
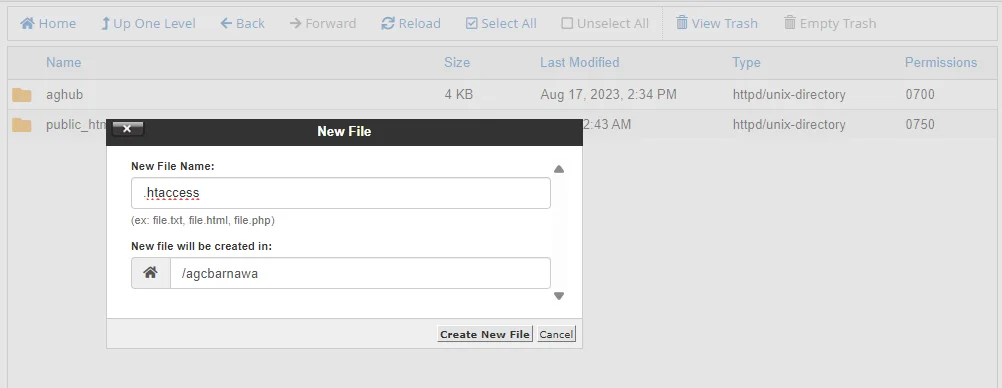
In the root directory or the /public_html folder of your website, look for a file named `.htaccess`. If you don’t find one, you can create a new text file and name it `.htaccess`.
Step 3 – Enable RewriteEngine
First you need to make sure that you have enabled the RewriteEngine. You can do this by adding the following
#Step 1: Enable the rewrite engine
RewriteEngine On
the `RewriteEngine` simply allows you to use the apache rewrite rules.


Step 4 – Add The HTTPS Rewrite Rules
Now add the part that actually does the HTTP to HTTPS redirect
#Step 2: Forcing HTTPs
RewriteCond %{HTTPS} off
RewriteRule ^(.*)$ https://%{HTTP_HOST}%{REQUEST_URI} [R=301,L]
`RewriteCond %{HTTPS} off` checks if the HTTPS protocol is off.
`RewriteRule ^(.)$ https://%{HTTP_HOST}%{REQUEST_URI} [L,R=301]` redirects the user to the same URL with HTTPS.
`L` means this is the last rule, and `R=301` indicates a permanent redirect.
Step 4 – Save, and you are done!
Congratulation, you have are now done – and the only thing you have left to do, is saving the file, and wait for your changes to take effect!
