The complete guide to setup caching using .htacces file
25-08-2024 - Guides, htaccessUnderstanding why you should setup caching using .htacces file
Caching plays a vital role in enhancing web performance by temporarily storing copies of frequently accessed resources. So understanding caching and how it you can optimize your website performance with it, so understanding why you should setup caching using .htacces file is essential for any web developer or website owner.
The condensed version of caching is as follows; Caching works by storing copies of static files, such as HTML pages, images, JavaScript, and CSS, in cache storage. When a user visits a website, their browser downloads these files to display the webpage. If caching is set up properly, the browser saves these files locally, and on subsequent visits, the browser retrieves the necessary files from the cache rather than downloading them again from the server. This reduces the server load, decreases bandwidth consumption, and significantly speeds up page loading times.
There are different types of caching that can be employed. Browser caching, for instance, allows files to be stored locally on the user’s device. Server-side caching, on the other hand, stores files on the server, making it quicker to serve pages to multiple users. Content Delivery Network (CDN) caching is another strategy, where files are stored in caches distributed across various geographical locations, ensuring faster access for users globally.
The .htaccess file comes into play as a powerful tool for setting caching mechanisms. By configuring caching directives within the .htaccess file, you can dictate how and when resources should be cached. For example, setting expiration times for different file types ensures that users always have quick access to the most up-to-date content.
For a deeper look into caching, we have created an in depth blog – that explains everything that is worth knowing about caching, “What is Caching? A Deep Dive into What is Web Cache“

But what is .htaccess?
The .htaccess (Hypertext Access) file is a crucial configuration tool used by Apache-based web servers to manage a wide range of server settings at the directory level. This small yet powerful file enables you to set server directives, giving you granular control over your website’s behavior without altering the core server configuration.
One of the key advantages of the .htaccess file lies in its versatility. With appropriate directives, you can perform various tasks such as setting up redirects, customizing error pages, and enhancing security protocols. More importantly, when it comes to optimizing web performance, configuring caching rules in the .htaccess file can lead to substantial improvements. By defining expiration times for different types of files, you can instruct browsers to store these resources locally, dramatically reducing load times for returning visitors.
Moreover, a well-configured .htaccess file can boost your SEO rankings. Faster-loading sites are favored by search engines, and properly managing cache settings can contribute to a more efficient and faster user experience. In essence, mastering the .htaccess file empowers you to fine-tune your website, ensuring it runs efficiently, securely, and ranks better in search results, ultimately uplifting your site’s overall performance.
Step 1 – Access Your Server
Firstly, you need access to your website’s server files. Typically, you can do this via FTP (File Transfer Protocol) or through your web hosting control panel.


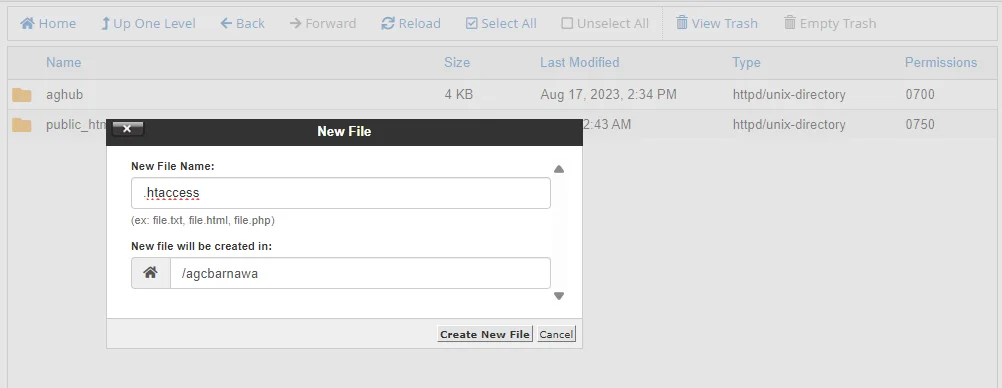
Step 2 – Create or Edit .htaccess File
In the root directory or the /public_html folder of your website, look for a file named `.htaccess`. If you don’t find one, you can create a new text file and name it `.htaccess`.
Step 3 – Enable the expire header
To enable browser caching using htaccess, we need to add a directive in our htaccess file to activate a module that we’ll use to set caching and expiration dates for the cached files.
After opening the .htaccess file, you now want to add the following:
<IfModule mod_expires.c>
    ExpiresActive On
</IfModule>


Step 4 – Setup image caching
After enabling the expire header, we wanna tell the browser what files should be cached, and how long they should be cached for.
Now we need to tell the web server that we want to cache the images on our website, we can do this using a directive that sets the expiration on images to a specified date, in this case 1 year.
<IfModule mod_expires.c> ExpiresByType image/jpg "access 1 year"
ExpiresByType image/jpeg "access 1 year" ExpiresByType image/png "access 1 year"
ExpiresByType image/gif "access 1 year"
</IfModule>
Note that the length is variable, and you can choose the exact length you want items to be cached for. A good rule of thumb to leveraging a browser’s capabilities for caching for images is setting long expiration times for images to leverage browser caching effectively.
Step 5 – Setup static file caching
After enabling caching for images – you wanna look into caching static files like: .css files, .html files, javascript files, PDF’s and so on.
When caching these type of files particularly the HTML files, you should set a reasonable time for refreshing the cache especially if you regularly make changes to your website / UI.
Just as when adding caching rules for images – you can add the following to your .htaccess file
<IfModule mod_expires.c> ExpiresByType text/css "access 1 week"
ExpiresByType text/html "access 1 week" ExpiresByType text/x-javascript"access 1 month"
ExpiresByType application/pdf "access 1 month"
</IfModule>


Step 6 – Save/Upload your .htaccess file
Save the changes to your `.htaccess` file and upload it to your website’s root directory if you made edits locally.
