How to add a DNS record on Namecheap.com
10-05-2024 - Guides, NameCheap.comA Step-by-Step Guide on how to add a DNS record on Namecheap.com
Setting up a website is a demanding task with intricate parts and complex configurations, with what seems like never-ending technologies and terminologies – all of this something that might seem very daunting, but in reality is very easy. One of those complex parts is the DNS, and whether you’re setting up a WordPress site, or transferring your domain to another hosting provider, you’ll encounter it.
In this step-by-step guide, We will be teaching you the basics of DNS, and arming you with the knowledge and skills, to add/remove DNS records and configuration your DNS on Namecheap.com.
What is a DNS and why do you need it?
DNS, is short for Domain Name System – a server that stores records of which webservers, domain are stored on – so when you visit a website, the browser can quickly locate the server with the website on. As each website on the internet lives on a webserver, and each server has a unique IP address e.g 192.155.227.41, that serves as an unique identifier for that server; so when you visit a website the DNS servers matches your domain names to their corresponding server’s IP addresses, and sends you to the correct website.
This is ofcourse just an very quick overview of what a DNS really is, to fully understand what a DNS is and how it works, we have made and in-depth explanation of What is DNS and How DNS Works.

Setting up and Namecheap Account
For this step-by-step guide we will assume that you already have a account&Domain on Namecheap.com – but if don’t have an account with Namecheap.com, you’ll need to create one here to follow along, do keep in mind that you’ll also require at least one registered Domain for this, and as the name implies, Namecheap.com offers incredibly cheap Hosting Services and Domain Names without compromising on quality service, so you don’t need to spend much, you can get a Domain for as little as $0.98 – which is great for getting started without breaking the bank.
Step 1 – Go to Namecheap.com and Sign in
Start by heading over to namecheap.com.
Then hover over the “Sign in” link at the top of the navigation bar at the top of your screen and a login form will appear.


Step 2 – Fill out the login form
Now enter you login details and click on the “Sign in” button to log in to your Namecheap account.
On successful authentication, you’ll be redirected to your Dashboard – here you can manage all your Namecheap services (ie Domains, Hosting, Emails, etc).
Step 3 – Navigate to “Domain List”
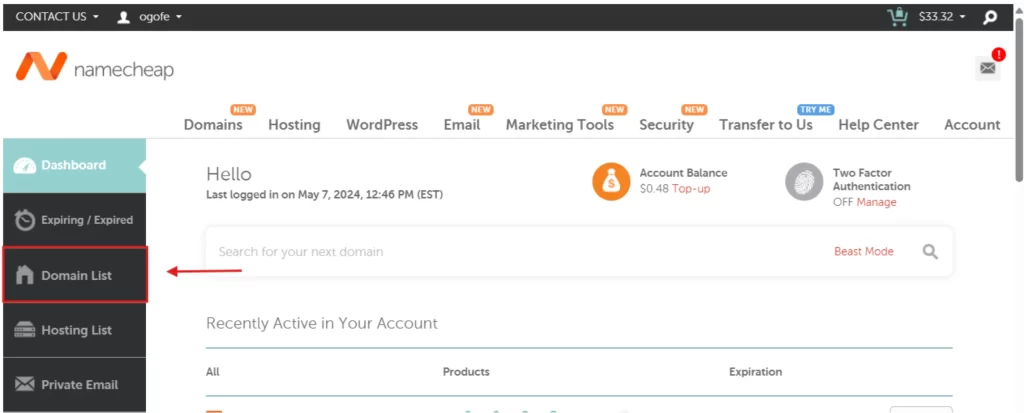
On your dashboard, using the navigation bar to your left, click on the “Domain List” link to go to the Domain Page


Step 4 – Locate the domain and click “Manage”
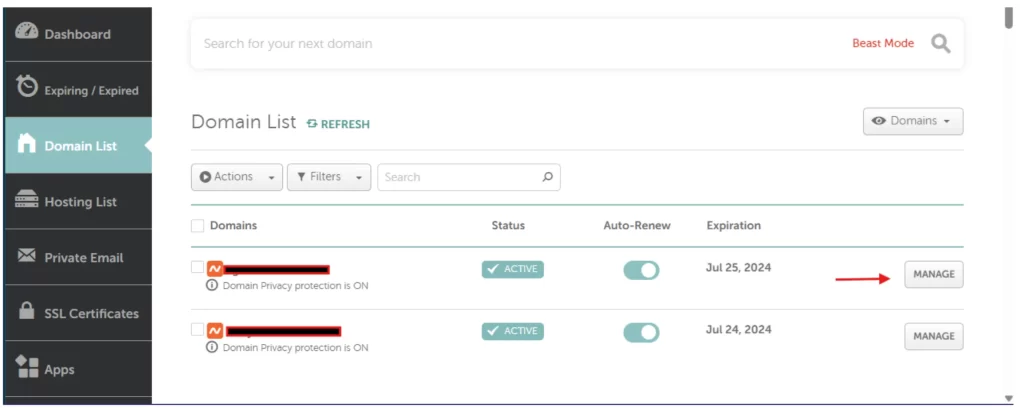
While on the domain management page, first locate the row for the domain you wish to add/remove/change a DNS record for.
When you have located the domain, you press the “Manage” button to the left
Step 5 – Find and “Advanced DNS”, Then “Host Records”
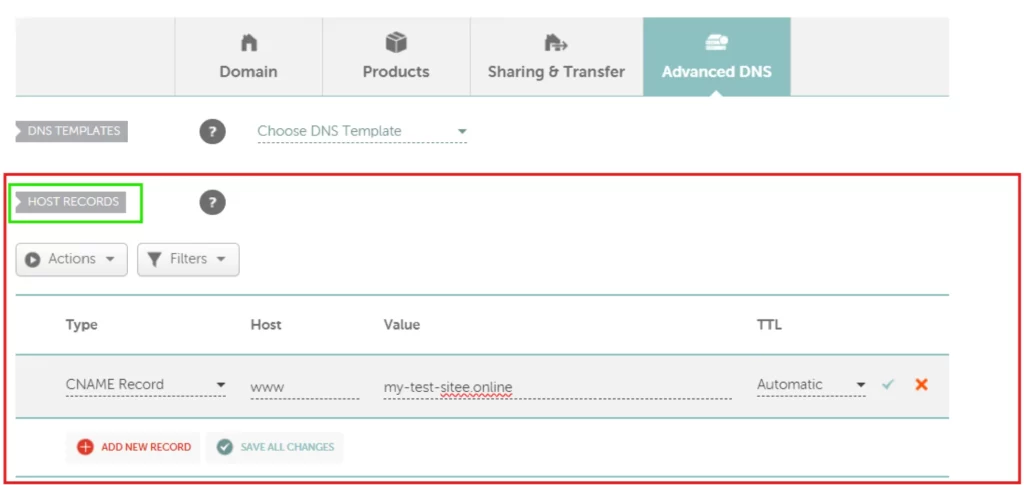
You should now be on a page, that is dedicated to the chosen domain. From here you wanna find the “Advanced DNS” Tab – and click it.
On the “Advanced DNS” tab, scroll down to the section “HOST RECORDS” – from here, you can add, edit, and remove DNS records from you DNS host.


Step 6 – Click “Add new Record”
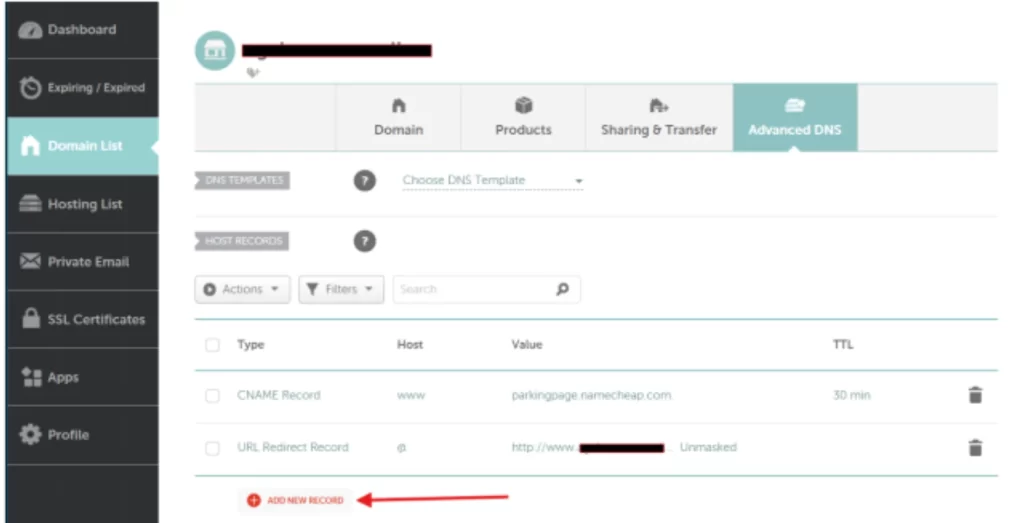
Click on the “Add New Record” button to add a new DNS record.
.
Step 7 – Chose your DNS record type
Now choose the type of DNS record you want to add (e.g., A, CNAME, MX) from the dropdown


Step 8 – Fill in the rest, and press the check mark
Now fill in the other required fields, including the host, value and TTL (Time To Live – recommend you set to Automatic) and click on the Save Changes button (the green checkmark).
Then Click on the green “Checkmark” button to save your new DNS record; note that changes to your DNS, including DNS records can take up to 48 hours, but it’s usually takes around 30 minutes.
