How to make Cloudflare Redirect HTTP to HTTPS
03-02-2024 - Cloudflare, GuidesAn introduction to Cloudflare Redirect HTTP to HTTPS
Understanding the importance of securing web traffic is paramount in today’s digital landscape. The process of Cloudflare redirect HTTP to HTTPS is a critical step for website administrators seeking to protect their users’ data from potential interception or manipulation by malicious entities. By implementing a Cloudflare HTTP redirect to HTTPS, website owners can assure that all communications between their web server and their users’ browsers are encrypted, providing a secure channel over which information can travel.
Furthermore, the Cloudflare HTTP to HTTPS redirect not only bolsters security but also aids in boosting the trustworthiness of a website in the eyes of both users and search engines – given that search engines like Google prioritize secure sites in their rankings.
The process of redirection can be easily managed through the Cloudflare dashboard, where rules can be set to automatically convert insecure HTTP URLs to secure HTTPS ones, without requiring any manual intervention from website visitors. This seamless approach ensures that all data remains confidential and integrity is maintained throughout the user’s browsing experience.

Understanding why HTTPS matters in 2024
In 2024, the call for heightened cybersecurity is louder than ever, with internet users increasingly aware of privacy and data protection concerns. This awareness places a spotlight on the need for secure connections, and this is where Cloudflare HTTP to HTTPS redirect might play an essential role in helping you secure your website.
HTTPS, which stands for HyperText Transfer Protocol Secure, is the secure version of HTTP – it adds a layer of encryption that secures the data exchanged between a website and its visitors. This encryption is akin to sealing a letter in an envelope before sending it through the mail, it ensures that sensitive information, such as passwords and credit card numbers, is not accessible to unauthorized individuals. When cloudflares HTTP to HTTPS redirect is enabled in the Cloudflare dashboard, every visitor trying to view your website – will be forced to use HTTPS, every time they attempt to access the website.
This simple yet effective action helps protect users from a range of online threats, including eavesdropping, content tampering, and impersonation attacks – all of which are particularly dangerous when transactions or data sharing are involved. Besides that, an HTTPS connection reassures visitors that they are interacting with a legitimate and secure site – and this is critical for any online interaction, be it browsing, shopping, or sharing personal information.
With cyber threats becoming more sophisticated and privacy regulations tightening worldwide, website operators are highly encouraged to use HTTPS – and in 2024 its easier then ever to enable, even as someone without a lot of technical knowledge.
How to Enable Cloudflare HTTP to HTTPS Redirect
In the following step-by-step guide, we will walk you through the configuration within the Cloudflare dashboard, where with a few clicks, you can enhance the security of your site. Whether you are a seasoned webmaster or new to website security protocols, our guide is designed to help you swiftly achieve an HTTPS-enabled site.
(Step 0 – Setup Cloudflare as your domains DNS)
If your domain is currently not using the Cloudflare DNS – we have made an easy to follow guide, you can find here: “how to setup cloudflare with your domain“.
If your site is already active on Cloudflare, proceed to step 1
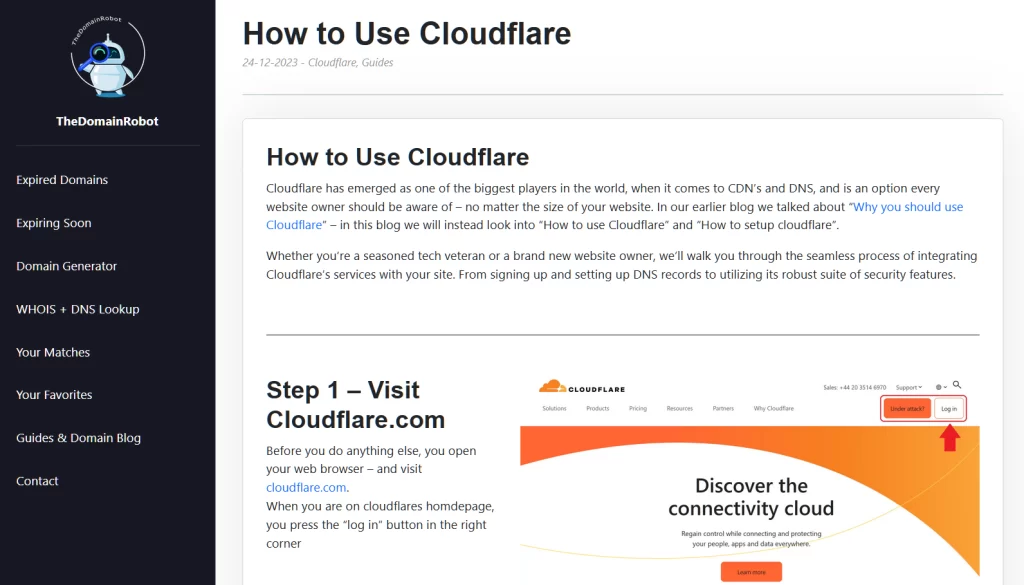

Step 1 – Go to Cloudflare.com
Open your web browser – and visit cloudflare.com.
When you are on cloudflares homdepage, you press the “log in” button in the right corner
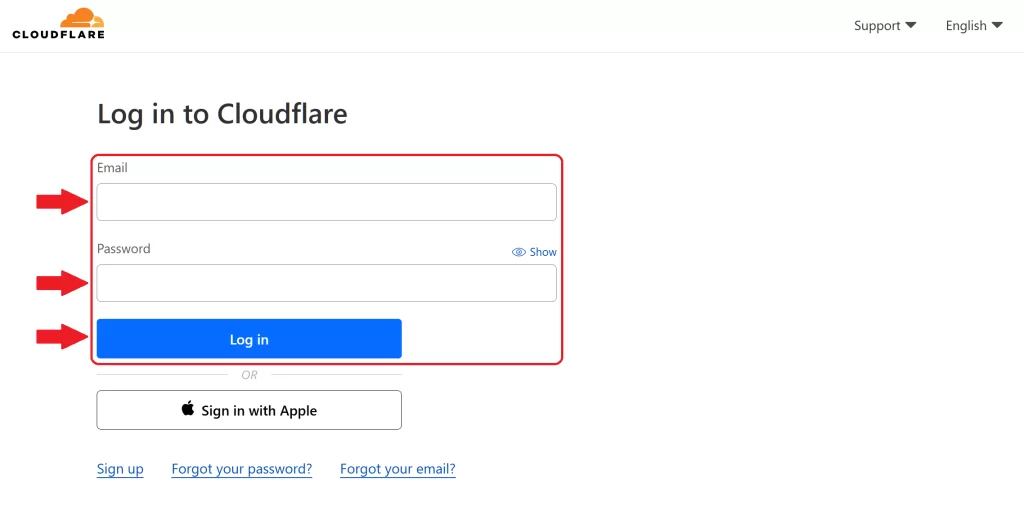
Step 2 – Log in to Cloudflare
On the login form fill out the email and password for your Cloudflare account – then press the “Log in” button
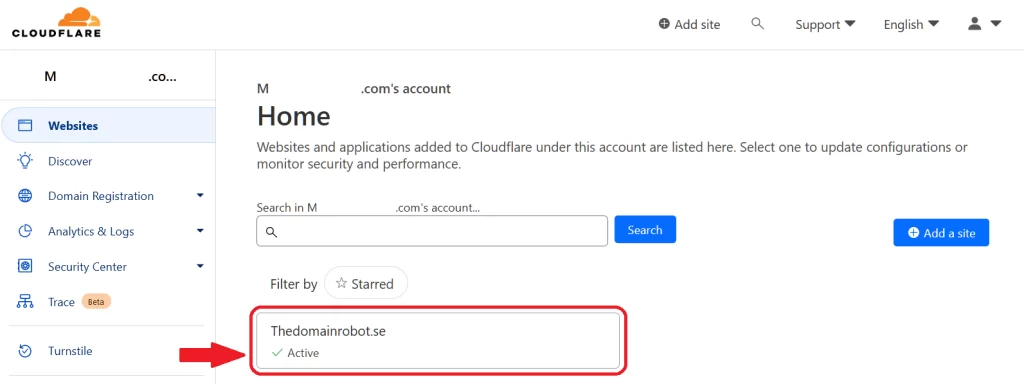
Step 3 – Go to the Domain Dashboard
Once in your Cloudflare Dashboard, you want to find your domain – and click it, to proceed to the Domain Dashboard.
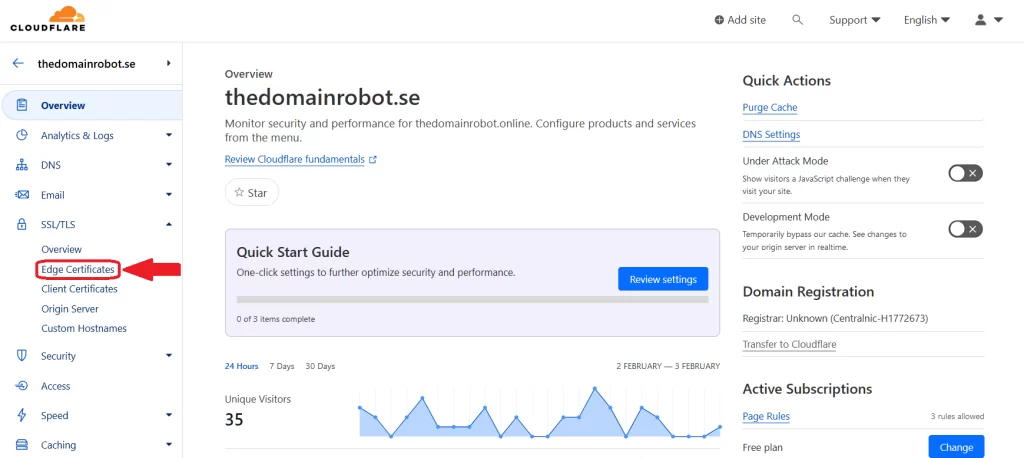
Step 4 – Go to SSL/TLS, Edge Certificates
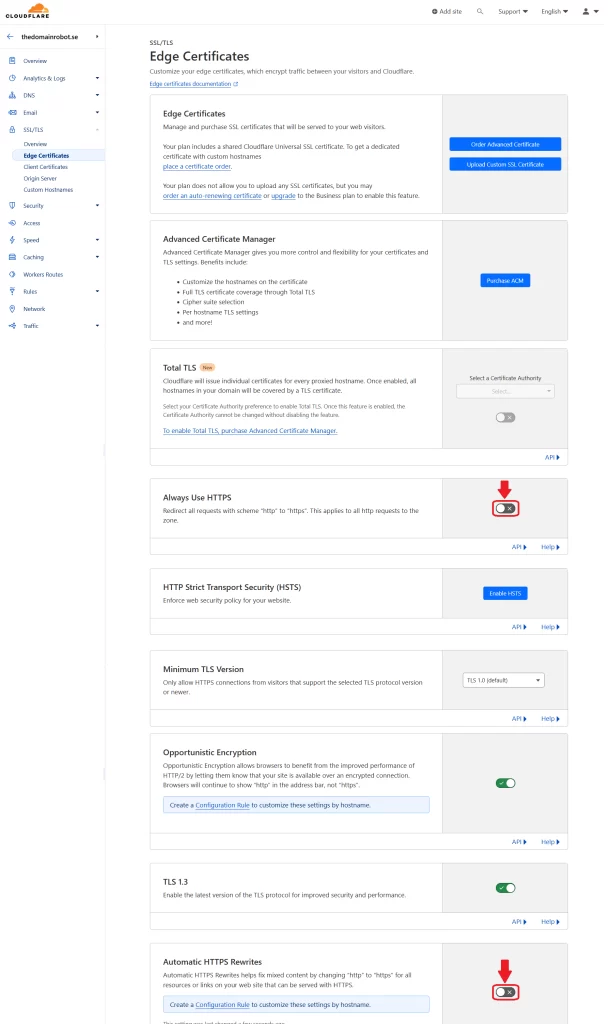
Once in your Domains Dashboard, you want to locate the navigation menu, in the right site – here you wanna find the “SSL/TLS” menu – and click it. This should open up the sub menu, here you wanna click on “Edge Certificates”
Step 5 – Enable Always HTTPS and HTTPS Rewrites
You should now be located on the Edge Certificates page. Here you wanna enable 2 things:
Always Use HTTPS
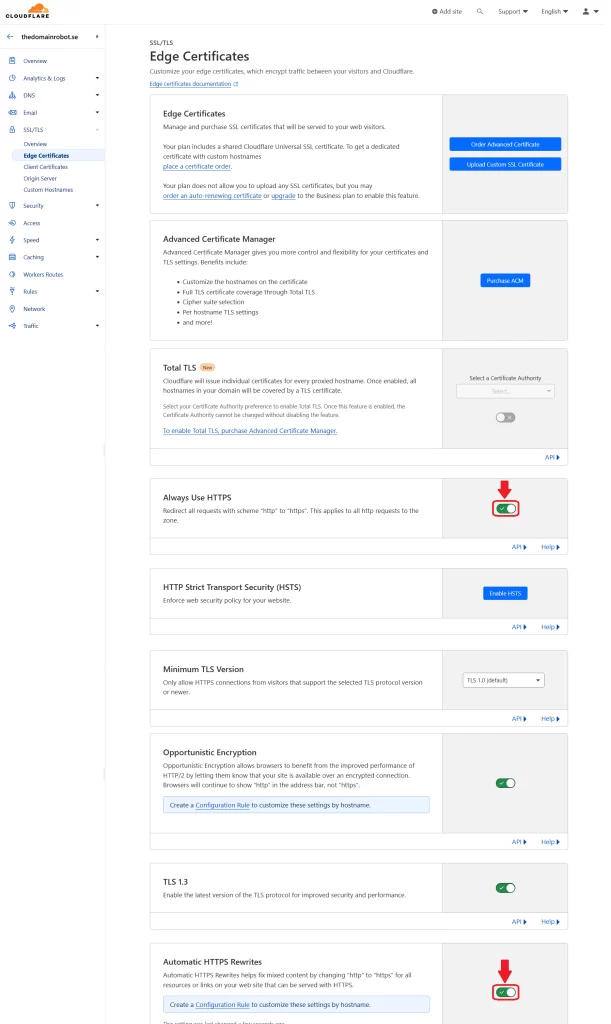
This option forces any visitor trying to view your website, to load it over HTTPS – no matter what. To enable this, you might have to scroll down a little bit – until you find the box, titled “Always Use HTTPS”, enable it, by toggling the button in the right side of the box.
Automatic HTTPS Rewrites
Automatic HTTPS Rewrites helps fix mixed content (Images, media files and so on) by changing HTTP to HTTPS for all resources or links on your web site that can be served with HTTPS.
Scroll down even further to find a box with the title “Automatic HTTPS Rewrites”, enable it, by toggling the button in the right side of the box
Step 6 – Wait, Patiently
Congratulation!, you have now managed to enable Cloudflare HTTP to HTTPS redirect. Because of how DNS and CDN’s work, it can take anywhere from 10 min to 60 min – before this change takes effect!
BUT wait! since it might not be obvious to everybody – enabling these 2 features in the Cloudflare Dashboard, only work if you use the Cloudflare proxy IP’s aswell. But this should be something everybody using Cloudflare should do by default, but in case does not already use this, and you dont know how to turn on Cloudflare proxies – we made a guide to help you – “How to turn on Cloudflare proxies“
Our other Cloudflare Related Guides
When you have managed to If you’re eager to deepen your understanding of Cloudflare and its suite of tools, you’ll find our archive of Cloudflare-related guides invaluable. From setting up your first domain to optimizing website performance with Cloudflare’s caching options, our comprehensive tutorials are here to assist. Don’t miss out on the wealth of knowledge we’ve compiled to help you make the most of Cloudflare’s offerings. You can explore our other guides here:
- How to Use Cloudflare for a Turbocharged Website
- Your Ultimate Guide to Cloudflare Domain Redirect
- How to Turn on The Free Cloudflare Proxy Service
- Secure your website with the Free Cloudflare Bot Fight Mode
- Secure Your Assets, with Cloudflare Hotlink Protection
- How to Instantly Purge Cloudflare Cache
- How to Set Cloudflare Browser Cache TTL
- How to Redirect an Expired Domain with Cloudflare
- How to Enable Cloudflare Compression to Speed Up Your Site
- How to Enable the Cloudflare Block Country Feature
