How to Enable Auto Cloudflare Minify for Free Performance
03-02-2024 - Cloudflare, GuidesAn introduction to Cloudflare Minify
In the realm of website management, the pursuit of efficiency is ceaseless. Amidst this pursuit, Cloudflare stands out as a beacon, offering an array of web performance solutions. Among these, Minify emerges as a particularly impactful tool – if it something your current webhost doesnt automaticly provide, or build into your website already!
Cloudflare Minify is very much like a diligent editor who meticulously combs through a manuscript, excising extraneous words and sharpening verbose sentences, all to present you with a sleeker, more compelling narrative. In the context of your website, it’s this tool’s job to streamline the code underpinning your digital presence. It meticulously goes through your site’s JavaScript, CSS, and HTML, and refines them by removing unnecessary characters that computers don’t need to understand the code – this include spaces, line breaks, and comments. The result of this “editing” is code that’s that takes far less space – meaning its easier for browser to load.
The beauty of Cloudflare Minify is rooted in its subtlety and simplicity. Despite being powerful, it requires no complex technical maneuvering on your part. By activating this function, your website visitors can enjoy faster page loading times, with information transferring at a brisker pace due to the reduced size of the code files. This isn’t just about sheer speed; it’s about enhancing user experience and ensuring that anyone accessing your site, regardless of the device they are on or the speed of their internet connection.
Crucially, all this optimization takes place within Cloudflare’s powerful network, meaning it’s applied almost invisibly, without demanding any manual rigors from website administrators.
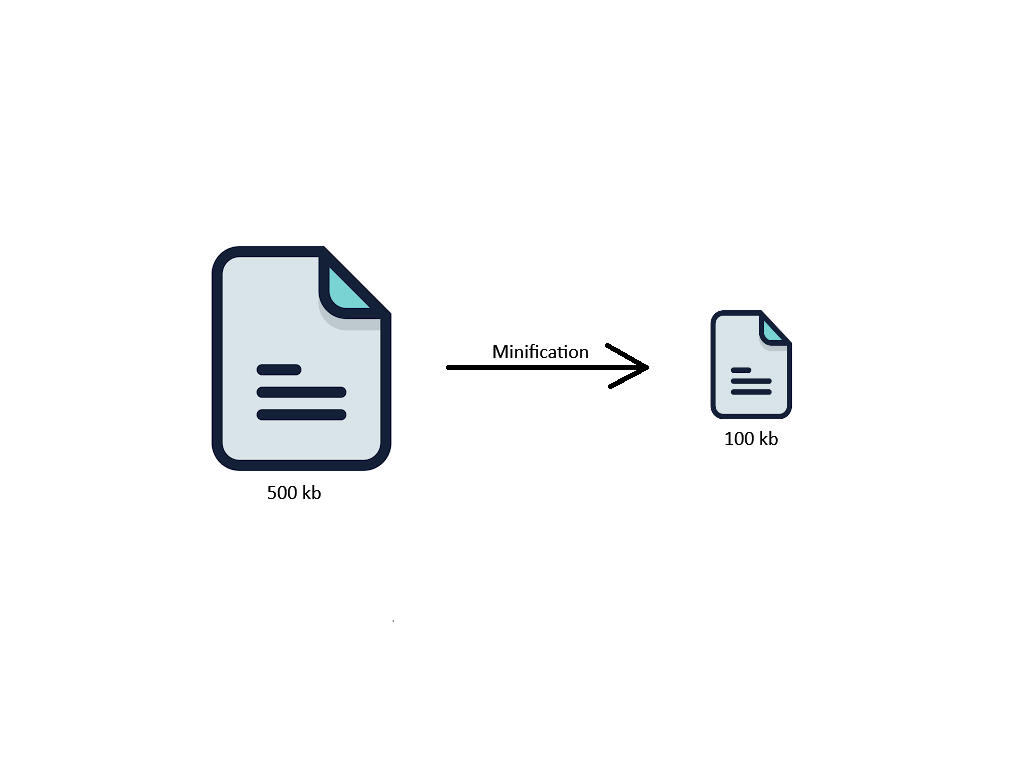
Why You Should ALWAYS Minify Your Files
In the digital landscape where speed and performance govern user experience, minifying your files is an essential practice. Particularly, Cloudflare minify services standout by streamlining the process for web developers and site owners – and makes it easy for anybody to do, even when you have little to no technical knowledge.
At the forefront, Cloudflare minify targets three core file types: CSS, HTML, and JS. By deploying Cloudflare minify CSS, you eliminate unnecessary characters from your style sheets. This refinement ensures quicker loading times and ultimately, a smoother visual experience for users. Understanding that styles are critical for first impressions, it is paramount to optimize your CSS through minification.
Additionally, Cloudflare minify HTML cannot be overstated. Your website’s structure hinges on HTML, making its efficiency vital for overall performance. Cloudflare’s minification process reduces file size without altering functionality, offering users faster access to your content, which can significantly improve site engagement and reduce bounce rates.
Cloudflare minify JS addresses the interactive elements of your site. JavaScript files, integral for dynamic elements, can be large and negatively impact load times. Utilizing Cloudflare’s minifying tool, you can streamline these scripts, thus enhancing functionality and the user’s interactive experience without compromising the utility of JavaScript.
Incorporating Cloudflare’s minification tools into your website optimization strategy leads to speed gains, improved user experiences, and potentially better search engine rankings. With enhanced speed and reduced bandwidth usage, Cloudflare minify offers a comprehensive solution to maintain an edge in the competitive online space.
How Much Can You Save by Minifying Files?
The savings garnered from minifying files can be substantial, particularly with high-traffic websites comprising multiple pages and complex scripts. By employing minification, you reduce file sizes, which translates into faster data transmission and reduced bandwidth consumption. Cloudflare minification processes can trim down CSS, HTML, and JavaScript file sizes by approximately 20% to 60% on average – this reduction can lead to significant savings, especially when considering the cumulative effect of numerous files and heavy site traffic.
For example, if an unminified JavaScript file is 300 KB, minifying could potentially cut it down to 180 KB. Multiply this reduction across all scripts and styles on your site, and the data savings can be immense – additionally, smaller files require less server resources to serve and lower data transfer costs, especially beneficial for sites operating at scale. Not only do these savings benefit operating costs, but they also contribute to an overall better user experience with faster page load times. Enhanced loading speeds can improve SEO rankings, as search engines favor higher-performing sites.
How to Enable Auto Cloudflare Minify
Enabling Cloudflare’s auto minify feature is a straightforward process that can greatly enhance your website’s performance. This capability automatically compresses CSS, HTML, and JavaScript files, streamlining your site’s loading time and improving user experience. The following guide will walk you through each step to activate this powerful optimization tool within your Cloudflare dashboard.
(Step 0 – Setup Cloudflare as your domains DNS)
If your domain is currently not using the Cloudflare DNS – we have made an easy to follow guide, you can find here: “how to setup cloudflare with your domain“.
If your site is already active on Cloudflare, proceed to step 1
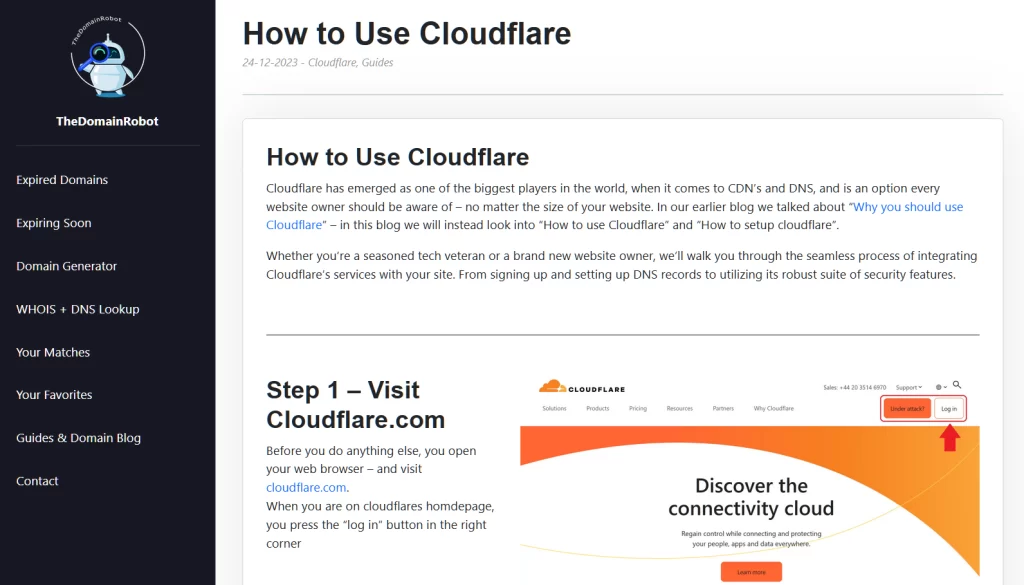

Step 1 – Go to Cloudflare.com
Open your web browser – and visit cloudflare.com.
When you are on cloudflares homdepage, you press the “log in” button in the right corner
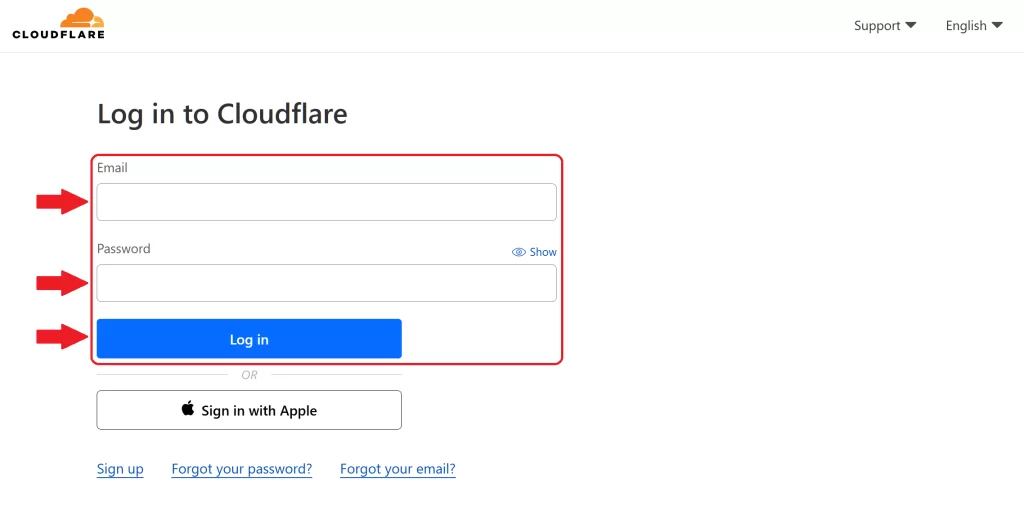
Step 2 – Log in to Cloudflare
On the login form fill out the email and password for your Cloudflare account – then press the “Log in” button
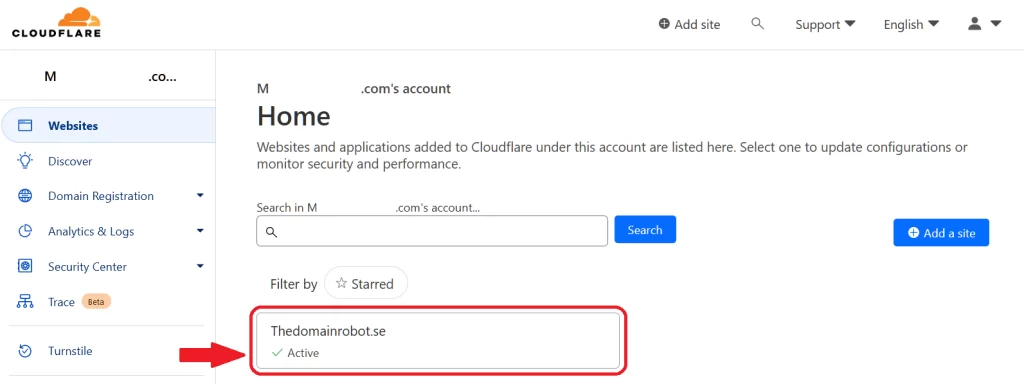
Step 3 – Go to the Domain Dashboard
Once in your Cloudflare Dashboard, you want to find your domain – and click it, to proceed to the Domain Dashboard.
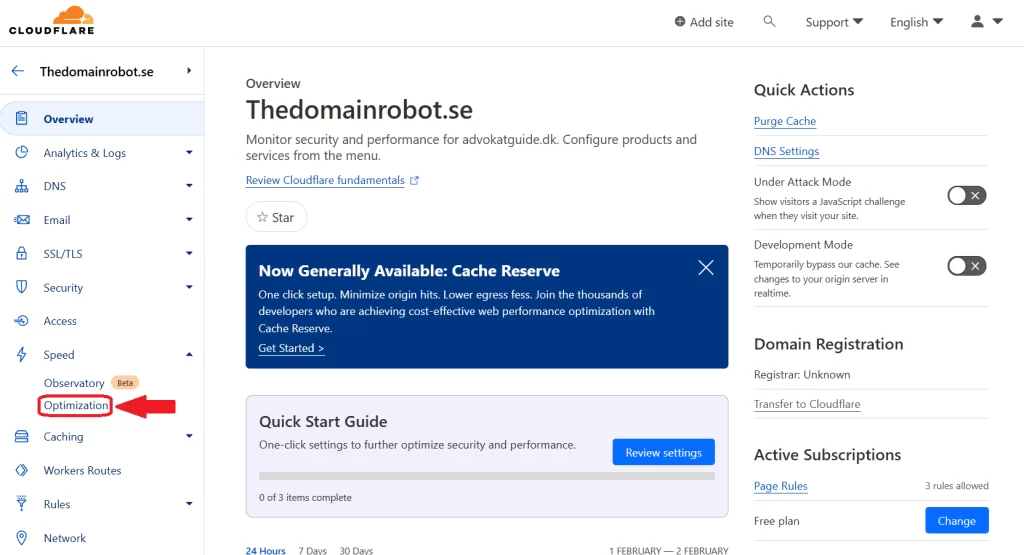
Step 4 – Go to Speed, Optimization
Once in your Domains Dashboard, you want to locate the navigation menu, in the right site – here you wanna find the “Speed” menu, and then click the Optimization sub menu
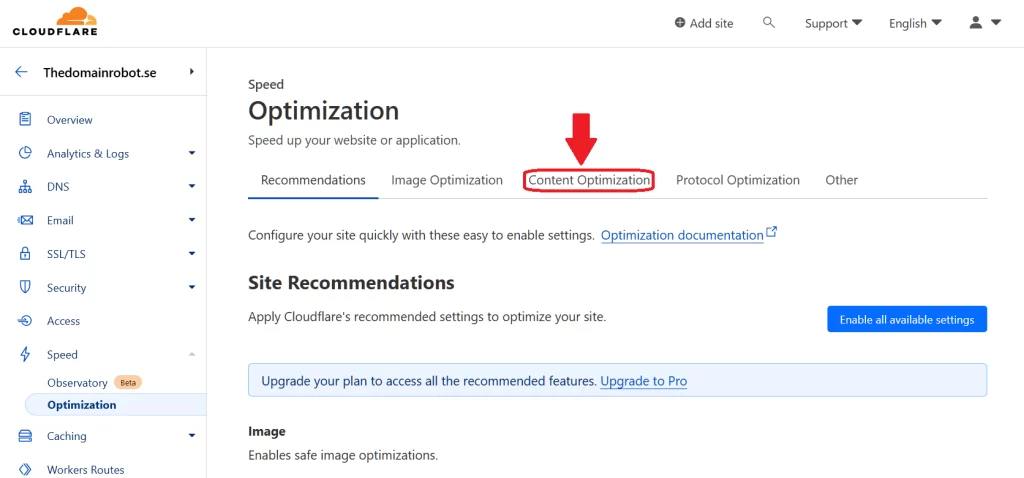
Step 5 – Go to Content Optimization
From here you wanna find the “Content Optimizatoin” tab, and click it
Step 6 – Enable Cloudflare Minification
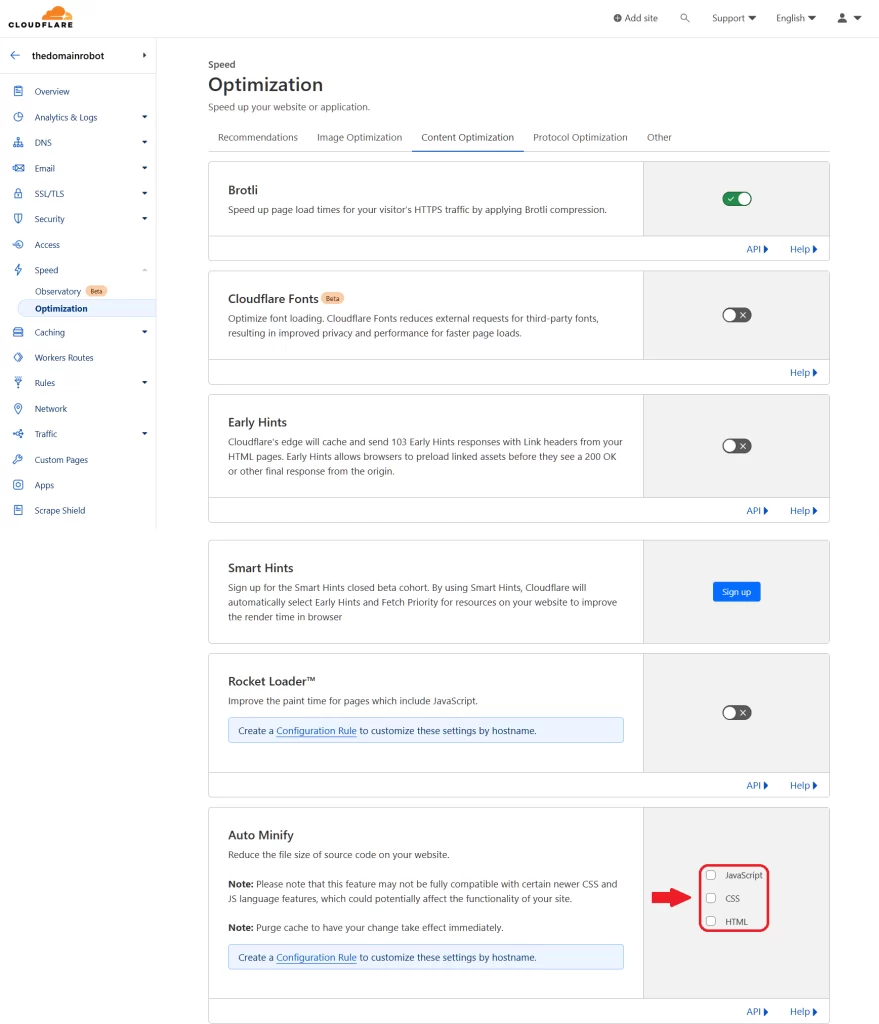
You should now be able to see everything inside the “Content Optimization” tab. You know wanna scroll down to the box “Auto minify” box, and in the right side – in turn, click each of the 3 types, to enable minification for that file type.
- JavaScript
- CSS
- HTML

Step 7 – Wait, patiently
Congratulation!, you have now managed to enable auto Cloudflare Minify. But you do need to be a little patient though – because of how DNS and CDN’s work, it can take anywhere from 10 min to 60 min – before this change takes effect!
BUT wait! since it might not be obvious to everybody – using Cloudflares Minification, only work if you use the cloudflare proxy IP’s aswell. But this should be something everybody using Cloudflare should do by default, but in case does not already use this, and you dont know how to turn on Cloudflare proxies – we made a guide to help you – “How to turn on Cloudflare proxies“
Our other Cloudflare Related Guides
When you have managed to If you’re eager to deepen your understanding of Cloudflare and its suite of tools, you’ll find our archive of Cloudflare-related guides invaluable. From setting up your first domain to optimizing website performance with Cloudflare’s caching options, our comprehensive tutorials are here to assist. Don’t miss out on the wealth of knowledge we’ve compiled to help you make the most of Cloudflare’s offerings. You can explore our other guides here:
- How to Use Cloudflare for a Turbocharged Website
- Your Ultimate Guide to Cloudflare Domain Redirect
- How to Turn on The Free Cloudflare Proxy Service
- Secure your website with the Free Cloudflare Bot Fight Mode
- Secure Your Assets, with Cloudflare Hotlink Protection
- How to Instantly Purge Cloudflare Cache
- How to Set Cloudflare Browser Cache TTL
- How to Redirect an Expired Domain with Cloudflare
- How to Enable Cloudflare Compression to Speed Up Your Site
- How to Enable the Cloudflare Block Country Feature
