How to Turn on The Free Cloudflare Proxy Service
26-12-2023 - Cloudflare, GuidesIntroduction to The Free Cloudflare Proxy Service
The cornerstone of Cloudflare’s services is the robust cloudflare proxy system, designed to sheathe your website with a protective layer against a broad range of cyber threats. By default, once you add your domain to Cloudflare, DNS records that can be proxied will show an orange cloud icon in your DNS settings. Activating the Cloudflare proxy for your website ensures that your web traffic is routed through Cloudflare’s global network, optimizing speeds and blocking threats before they can reach your server.
Understanding how Cloudflare proxy works is imperative for leveraging its full potential – in short it operates by receiving your domain’s traffic and passing it through an intelligent global network that filters out malicious activity like DDoS attacks while providing performance enhancements via CDN services.
The Cloudflare DNS proxy acts as a guard, making use of the vast Cloudflare infrastructure to process DNS requests quickly and securely, which in turn keeps your web assets safe and accelerates your site’s responsiveness for users worldwide. In the following paragraphs, we will break down the steps you need to follow to successfully enable the Cloudflare proxied DNS feature. This action not only hides your website’s actual IP address from potential attackers but also taps into additional benefits such as SSL/TLS encryption and intelligent traffic routing.
How Cloudflare Proxy Works
When you configure your domain with Cloudflare, you have the option to toggle the Cloudflare proxy feature on. Doing so initiates a sequence of events that redefine how your site interacts with visitors. Once the Cloudflare proxied is activated, the Cloudflare DNS proxy takes over the handling of your domain’s DNS requests. This means that all traffic destined for your website is first intercepted by Cloudflare’s extensive network of servers.
Here’s where the magic happens, so instead of directly reaching your site, users connect to the nearest Cloudflare data center that then redirect them to your server if needed – this geographical proximity ensures lower latency, effectively speeding up the loading time for your users, no matter where in the world the user are from
The Cloudflare proxied DNS system also adds a layer of anonymity to your service infrastructure by masking your server’s actual IP address. This is crucial because it helps prevent attackers from directly accessing and potentially compromising your server. The exchange between Cloudflare and your viewer is seamless—your audience gets faster access and enhanced security without any additional steps on their part. Cloudflare’s algorithm intelligently filters incoming traffic, using threat intelligence to block harmful requests and letting through only legitimate ones. In sum, the Cloudflare proxy functions as a smart intermediary that optimizes web performance while maintaining robust security protocols.
How to Setup The Cloudflare Proxy Service
Embracing the Cloudflare Proxy Service can mark a significant upgrade to your website’s performance and security. The upcoming guide meticulously steers you through the setup process, enabling the proxy service that acts as a buffer between your visitors and your website’s server.
(Step 0 – Setup Cloudflare as your domains DNS)
If your domain is currently not using the Cloudflare DNS – we have made an easy to follow guide, you can find here: “how to setup cloudflare with your domain“.
If your site is already active on Cloudflare, proceed to step 1
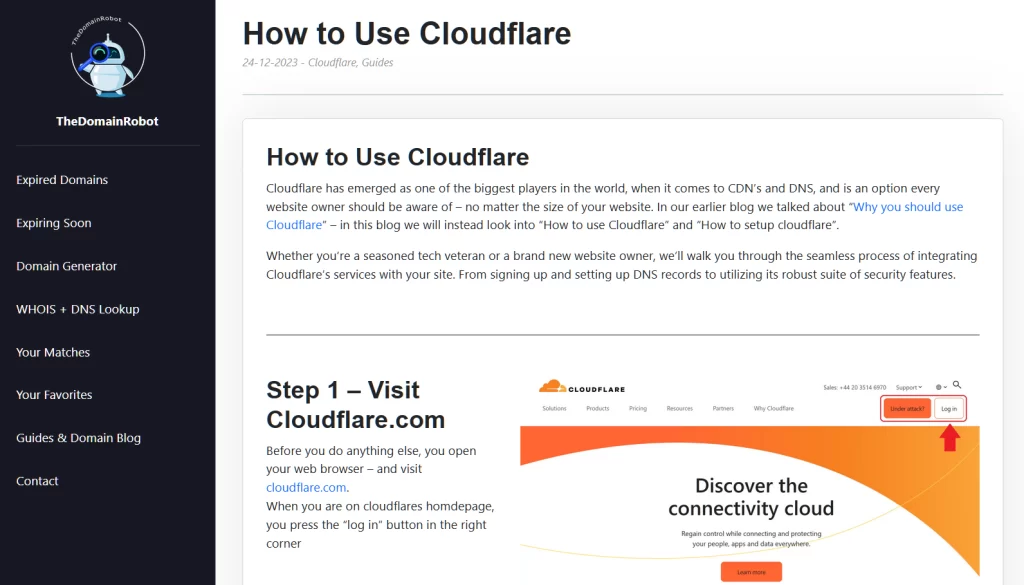

Step 1 – Go to Cloudflare.com
Open your web browser – and visit cloudflare.com.
When you are on cloudflares homdepage, you press the “log in” button in the right corner
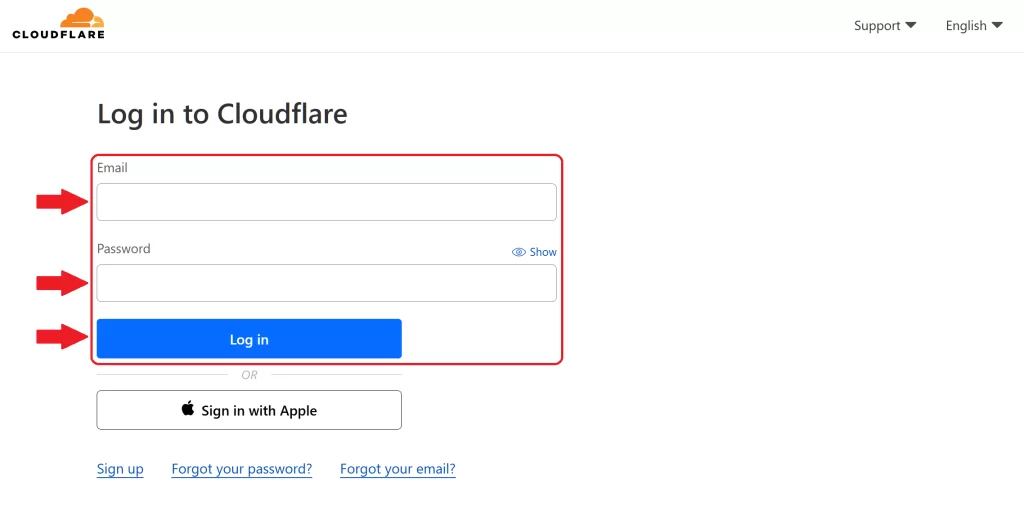
Step 2 – Log in to Cloudflare
On the login form fill out the email and password for your Cloudflare account – then press the “Log in” button
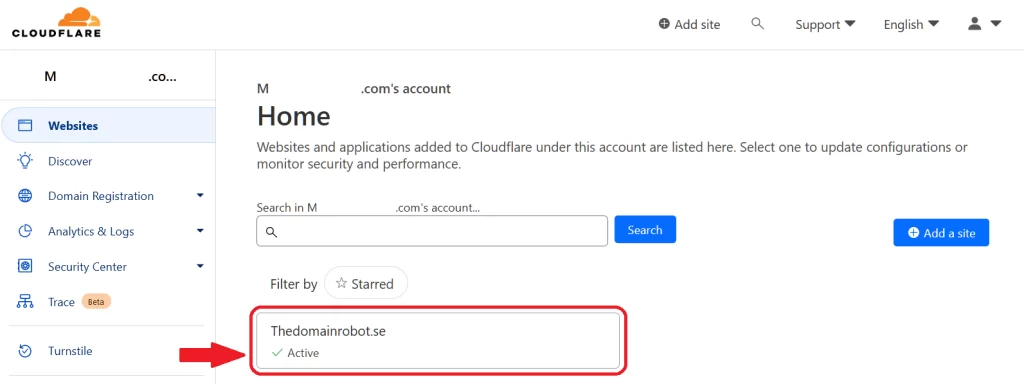
Step 3 – Go to your Domain Dashboard
Once in your Cloudflare Dashboard, find your domain – and click it it.
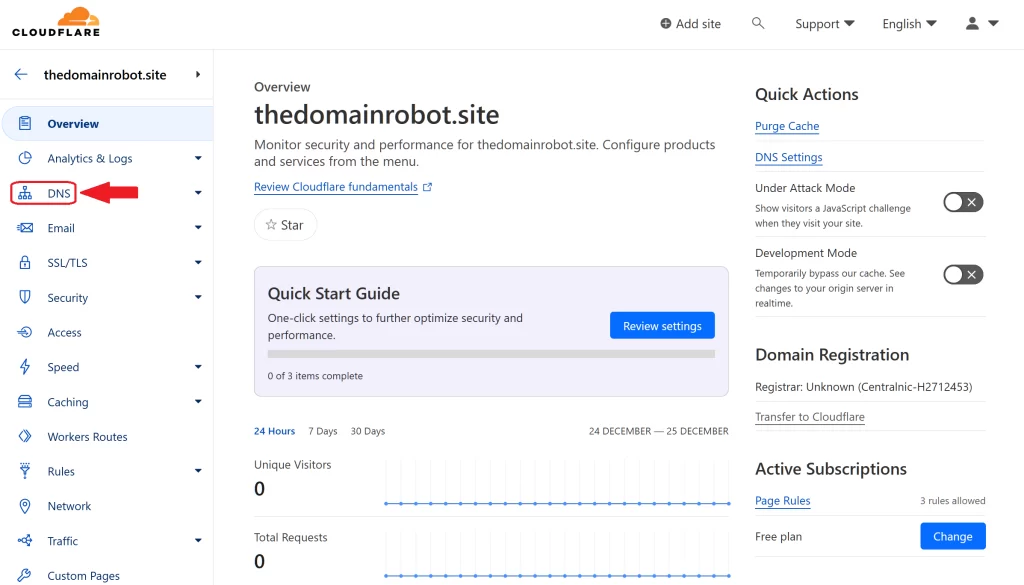
Step 4 – Go to the DNS page
In the left menu, find the DNS page – and go to it.
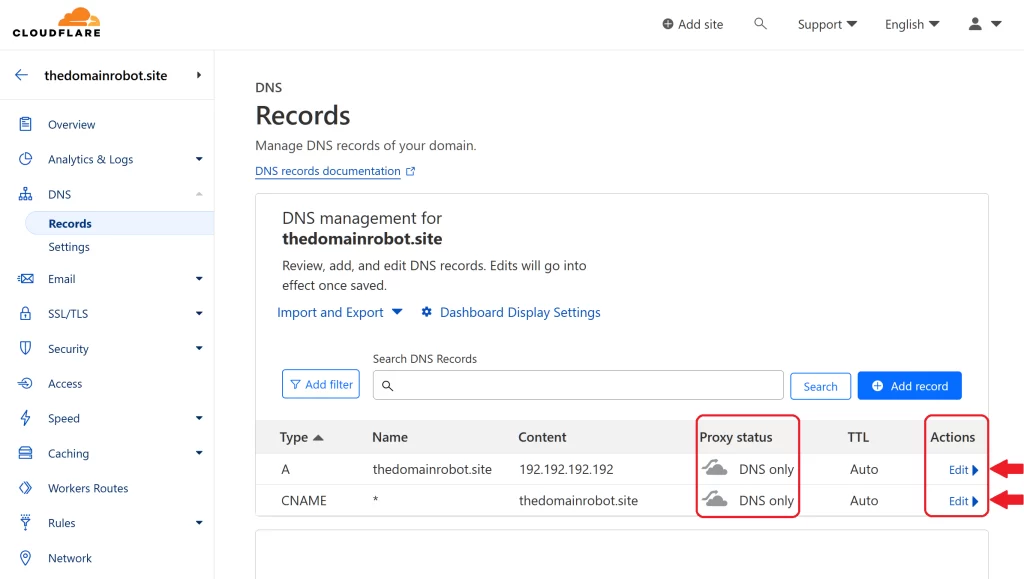
Step 5 – Confirm proxy status and edit
On your DNS page, you wanna find any A-Records and CNAME-Records related to your domain.
When you have found all your A-Records and CNAME-Records, you can should confirm in the “Proxy Status”-column that they currently are “DNS only” – if that is the case, you press “Edit” in the Action column
Step 6 – Enable Proxy
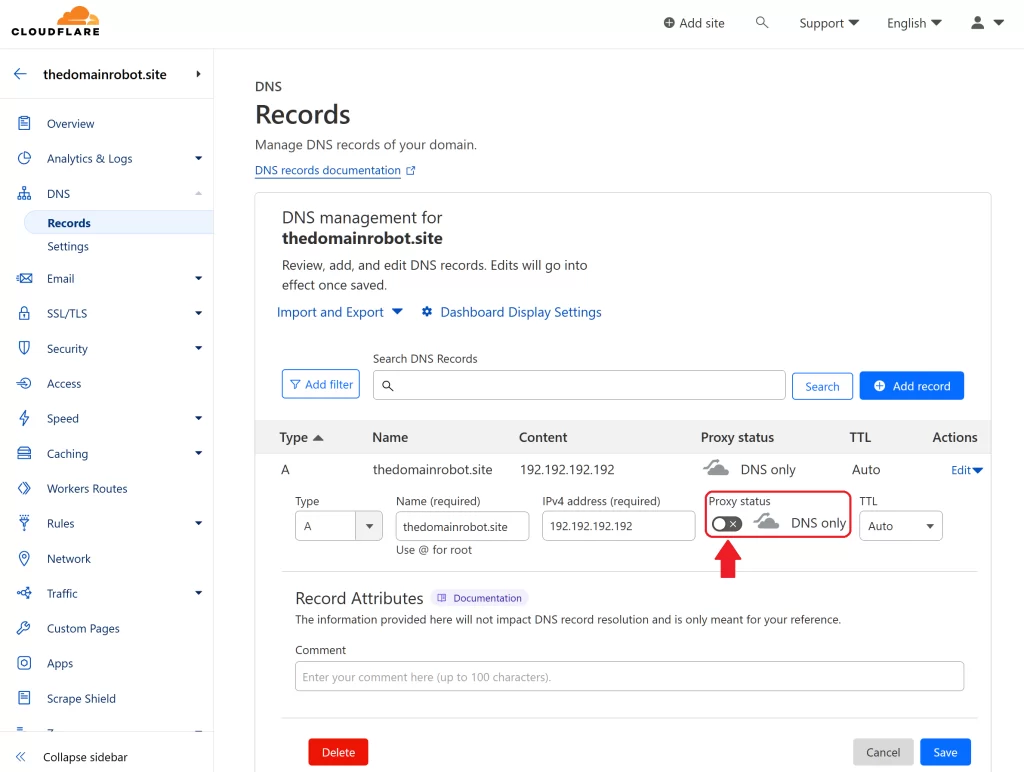
After pressing “Edit”, you should now be able to switch Proxy status On and Off – enable the proxy status
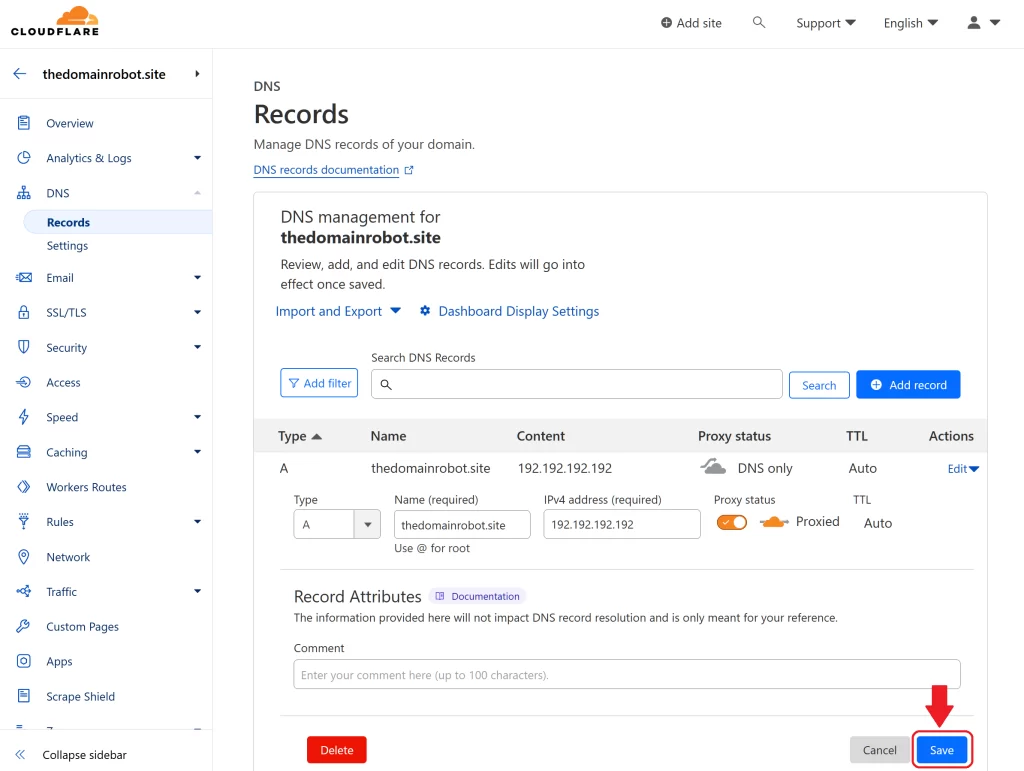
Step 7 – Save and repeat
After enabling the proxy status, find the “Save” button and click it.
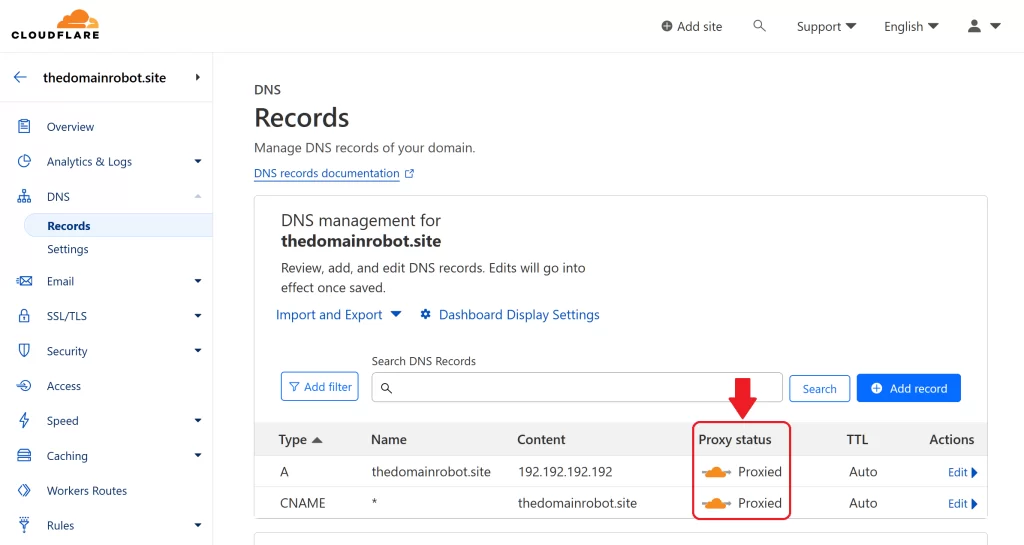
Now repeat the following steps, for each individual row/record that doesn’t have proxy status enabled
- Step 5
- Step 6
- Step 7
Step 8 – Wait patiently
Congratulation, you have now enabled a web proxy for your domain!. Be aware it might take anywhere from a couple of minutes to 1 hours – to start taking effect.
Our other Cloudflare Related Guides
When you have managed to If you’re eager to deepen your understanding of Cloudflare and its suite of tools, you’ll find our archive of Cloudflare-related guides invaluable. From setting up your first domain to optimizing website performance with Cloudflare’s caching options, our comprehensive tutorials are here to assist. Don’t miss out on the wealth of knowledge we’ve compiled to help you make the most of Cloudflare’s offerings. You can explore our other guides here:
- How to Use Cloudflare for a Turbocharged Website
- Your Ultimate Guide to Cloudflare Domain Redirect
- Secure your website with the Free Cloudflare Bot Fight Mode
- Secure Your Assets, with Cloudflare Hotlink Protection
- How to Instantly Purge Cloudflare Cache
- How to Set Cloudflare Browser Cache TTL
- How to Redirect an Expired Domain with Cloudflare
- How to Enable Cloudflare Compression to Speed Up Your Site
- How to Enable Auto Cloudflare Minify for Free Performance
- How to Enable the Cloudflare Block Country Feature
