How to Redirect an Expired Domain with Cloudflare
19-01-2024 - Cloudflare, GuidesHow to Redirect an Expired Domain with Cloudflare
In the realm of web administration and search engine optimization, the redirection of an expired domain represents a critical and nuanced task that can have a huge impact on your sites traffic, and a substantial boost your SEO. And because of that, we often get the question “How to Redirect an Expired Domain?” – because of that we have made this step-by-step guide, on how the process by which a you can point a previously registered and lately expired domain to a new URL – be that another domain or a specific page under a different address. While still trying to keep the inherent value that stems from any residual search equity and user traffic which the expired domain has accrued.
Like a lot of other things – their is multiple ways to achieve a desired outcome – but some are easier and more costly than others. If you are a little tech-savvy you could do a simple 301 redirection using the .htaccess file on your webserver – but this requires that you know your way around an FTP client and pay the monthly fee to a hosting company – something that can be very costly in the long run.
In our opinion a better (and free) way to redirect an Expired Domain, is to make use of Cloudflare’s redirection rules and the free tier Cloudflare plan. But if you for some reason wanna redirect using the .htaccess file instead, but don’t know how, we have an easy step-by-step guide called “How to Redirect an expired domain using the htaccess file“
What is Cloudflare Redirect Rules
Cloudflare offers a Redirect Rules feature, which empowers site owners with the ability to direct their website’s traffic as needed. This comes in handy when you’re trying to move visitors from an old URL to a new one automatically, whether it’s due to a page relocation or a URL change. These redirect rules are easily configured through Cloudflare’s user interface, eliminating the necessity for intricate coding.
The application of Cloudflare’s redirect rules spans a diverse set of scenarios. You might use them to point traffic from a former domain toward your current one, to channel visitors from an expired domain to your main site, to reroute users to a backup page should the intended content be inaccessible, or to secure your site by upgrading users from HTTP to HTTPS. Additionally, Cloudflare offers both permanent (301) and temporary (302) redirect options. These let website managers communicate to browsers and search engines whether a redirect should be viewed as a long-term move or a short-term solution, influencing how those redirects are processed and indexed.
(Step 0 – Setup Cloudflare as your domains DNS)
If your domain is currently not using the Cloudflare DNS – we have made an easy to follow guide, you can find here: “how to setup cloudflare with your domain“.
If your site is already active on Cloudflare, proceed to step 1
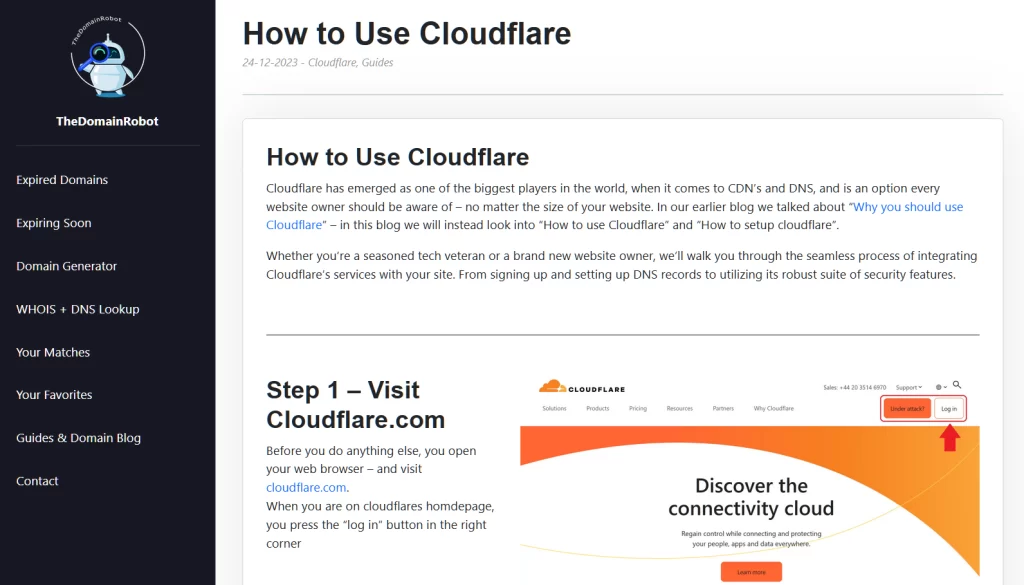

Step 1 – Go to Cloudflare.com
Open your web browser – and visit cloudflare.com.
When you are on cloudflares homdepage, you press the “log in” button in the right corner
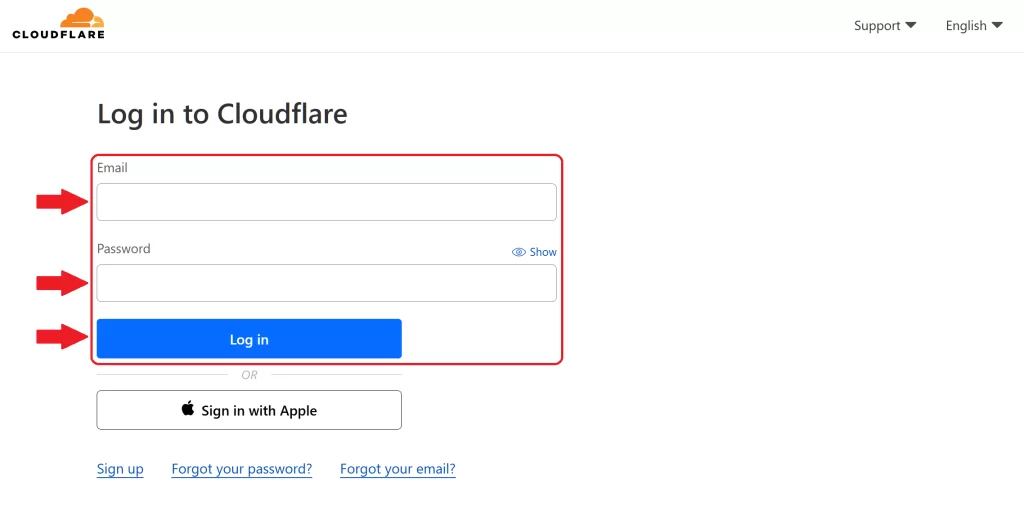
Step 2 – Log in to Cloudflare
On the login form fill out the email and password for your Cloudflare account – then press the “Log in” button
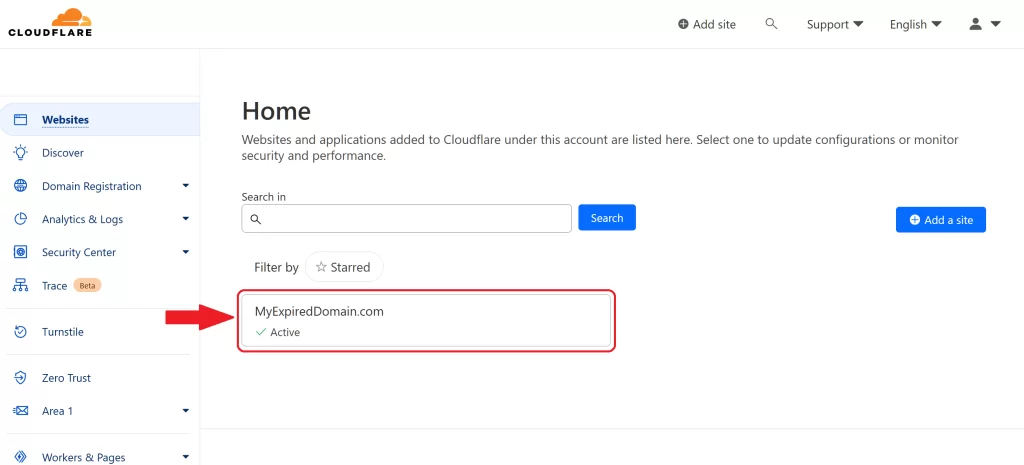
Step 3 – Go to the Domain Dashboard
Once in your Cloudflare Dashboard, you want to find your domain – and click it, to proceed to the Domain Dashboard.
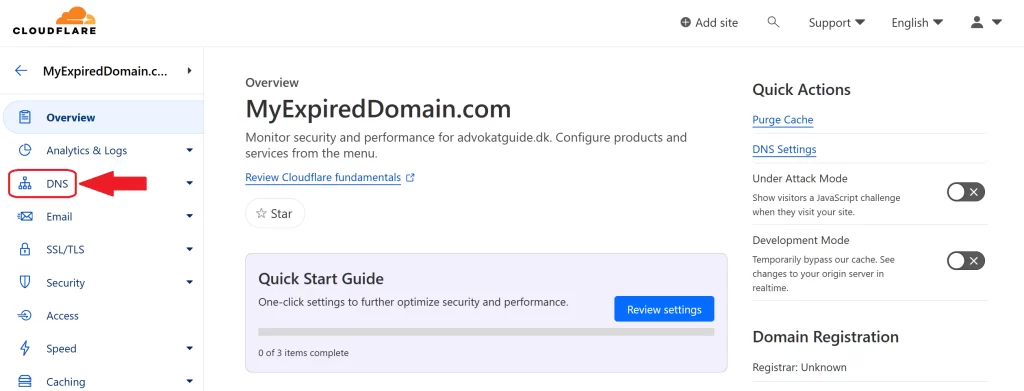
Step 4 – Go to the DNS Control
Once in your Domain Dashboard, you wanna find the DNS Sub Menu, in the left sidebar – and click on it
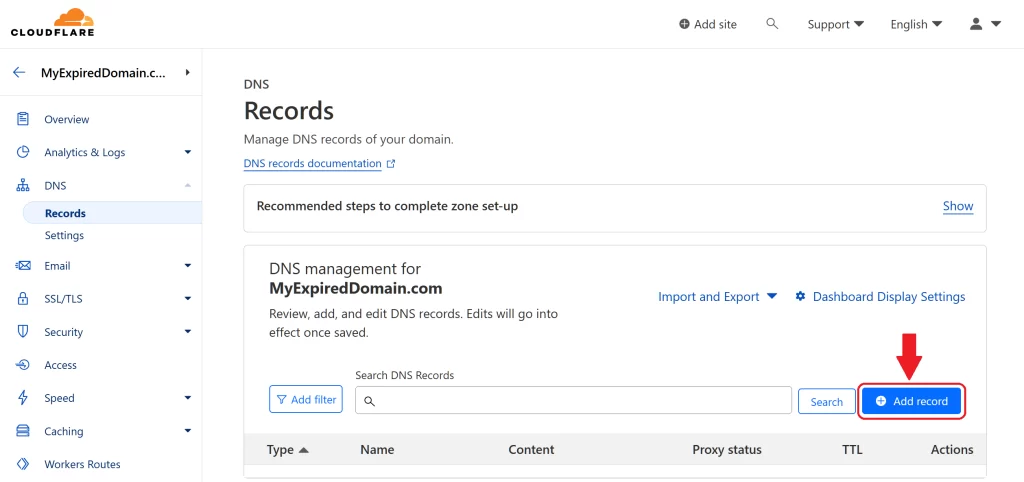
Step 5 – Press Add Record
You know want to add a new DNS record, so press “Add Record”
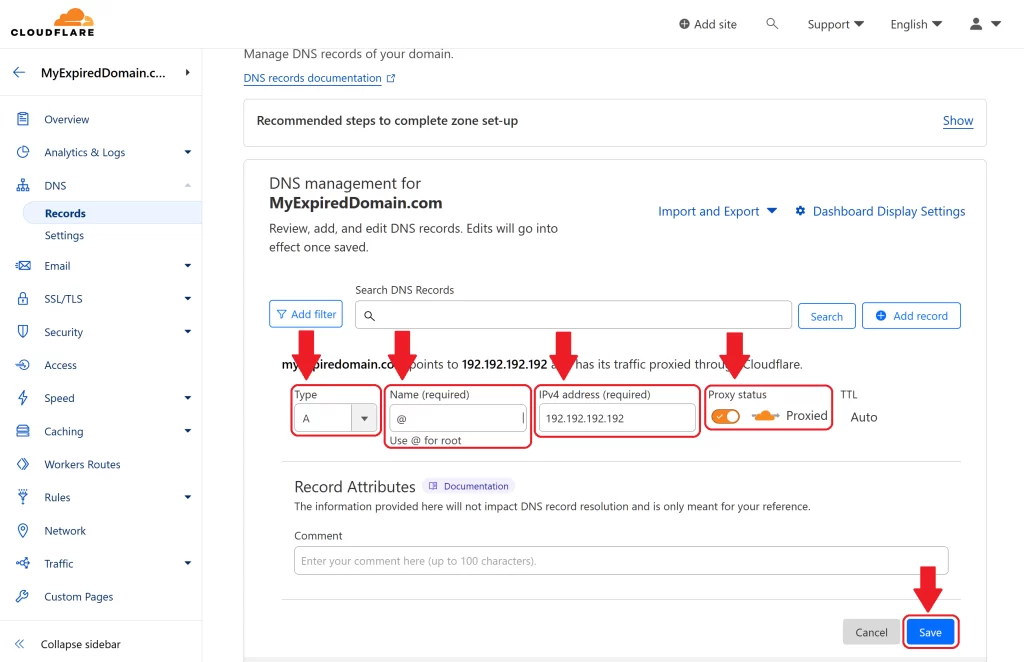
Step 6 – Add a 192.192.192.192, A Record
If you bought an expired domain without a hosting service, you most likely want have any previous DNS records – and because we need to have the DNS request routet past the Cloudflare servers, to make use of the Cloudflare Redirect Rules we need to add an “Dead” A Record
Type: Choose “A”
Name: Enther either the domain name or @
IPv4 Address:192.192.192.192 (or any other arbitrary IP)
Proxy Status: Toggle this to ON!
After you entering the information above, press the “Save” to save your new A Record
Step 7 – Go to Redirection Rules
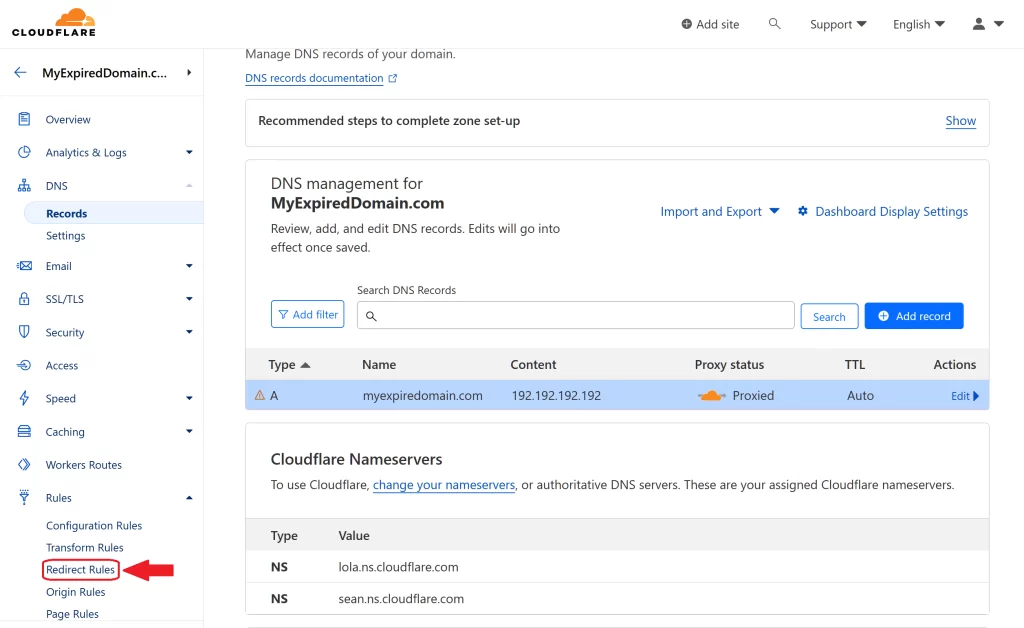
You have now created a new DNS A Record – so you should now proceed to the Redirection Rule Page, to create a new Redirection Rule.
So In the left menu you should be able to see “Redirect Rules” – click it
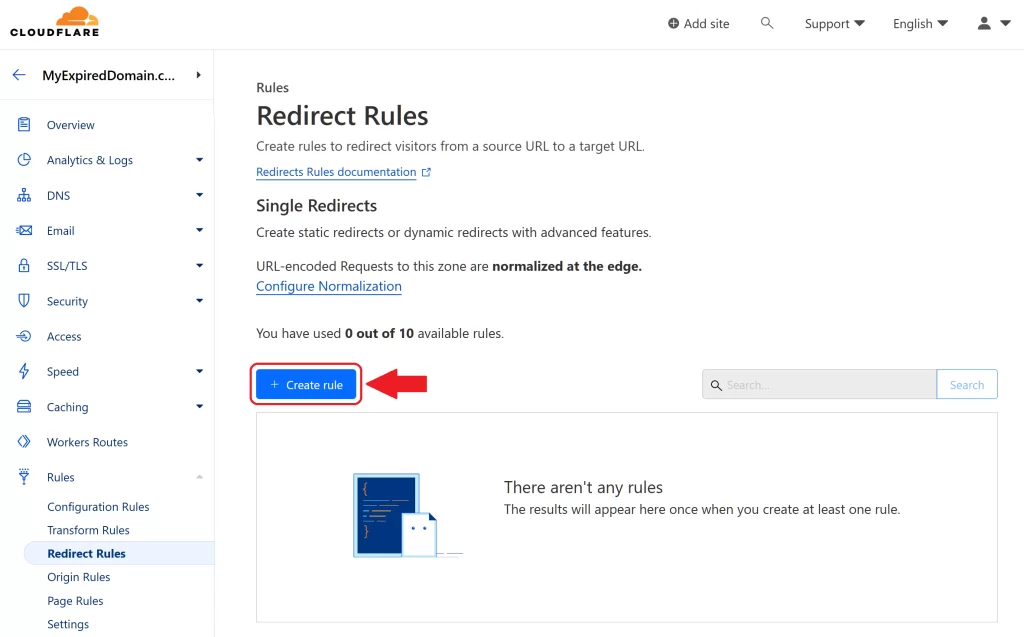
Step 8 – New Redirect Rule
Once on the Redirect Rules page, you should now create a new rule – you do that by pressing the “Create Rule” button.
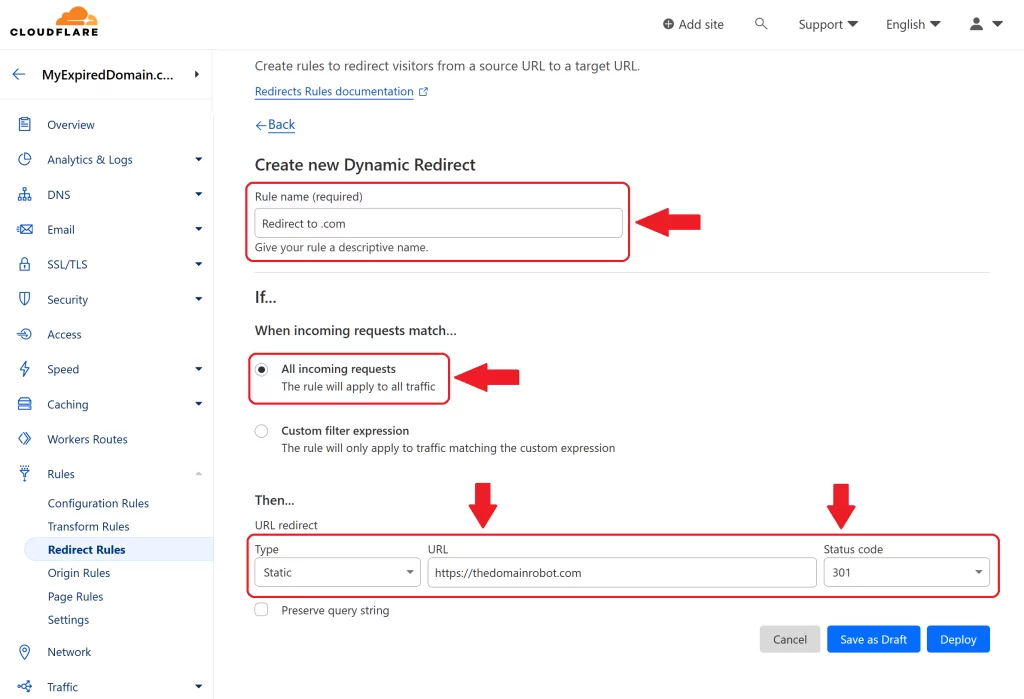
Step 9 – Creating the New Redirect Rule
You wanna create a rule that is applied to all traffic coming through your expired domain, and redirect it to your other site.
Start by giving your Redirect rule a name – choosing something that fits what the rule does, is always a good idea.
Next choose “All incoming requests” – meaning, all traffic going to your site will be subject to this specific rule.
And at last – you need to tell Cloudflare what it should do with all the incoming traffic – in this case we want the traffic redirect to the other site. So enter the following information
Type: Static
URL: https://[URL-of-the-receving-website.com]
Status Code: 301
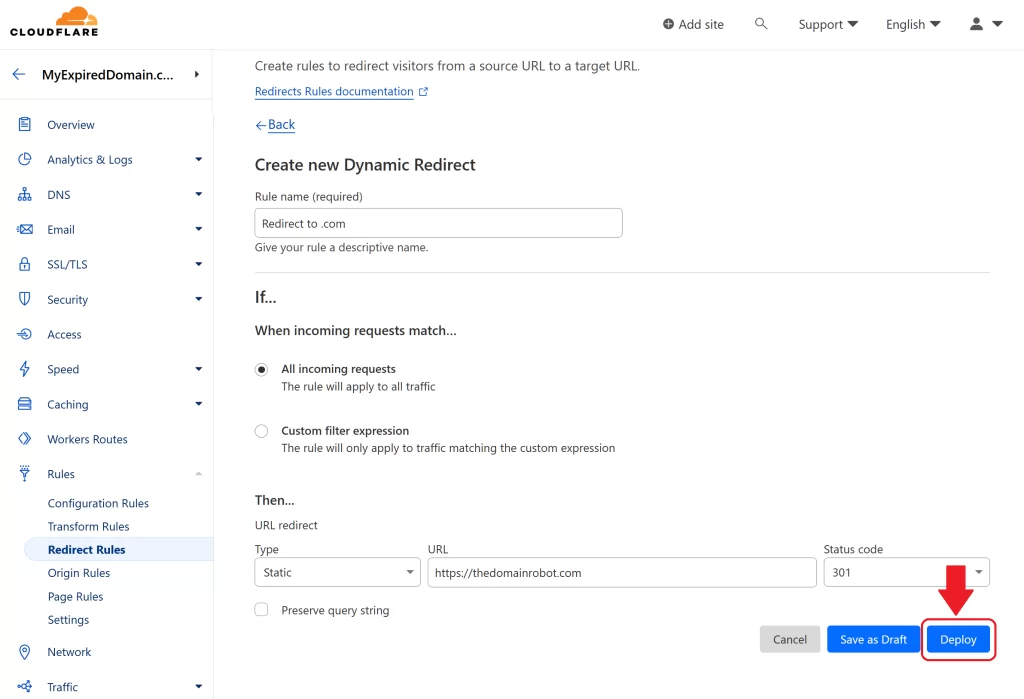
Step 10 – Deploy Redirect Rule
Confirm one last time, that your new redirect rule is exactly as you want it to – then press “Deploy”
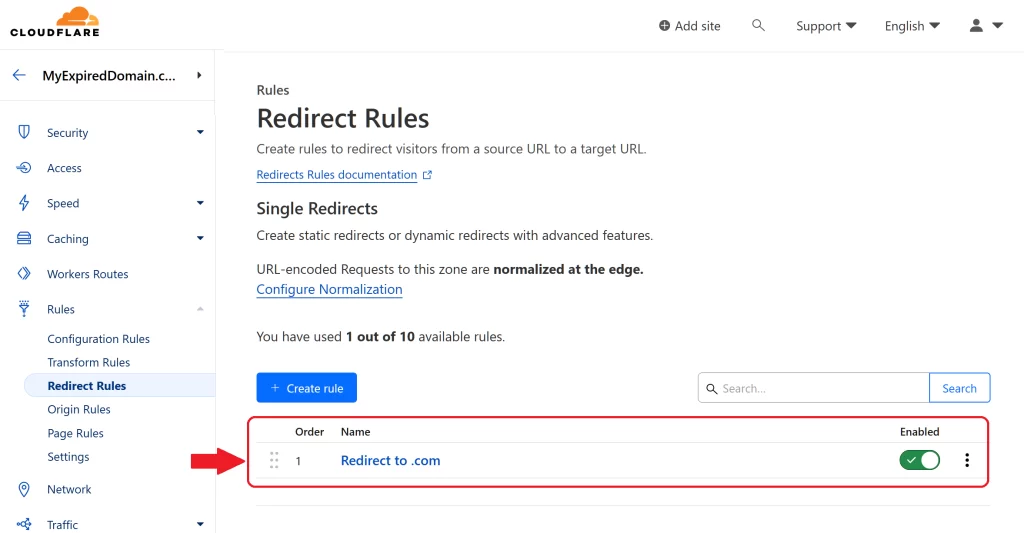
Step 11 – Wait patiently
Congratulation! – you have now successful achieved the goal redirecting an expired domain – to another website.
But you need to be aware that it might take up to 1 hour for these rules to propagate through out the Cloudflare network and take effect – so you need to ready, to wait patiently.
Our other Cloudflare Related Guides
When you have managed to If you’re eager to deepen your understanding of Cloudflare and its suite of tools, you’ll find our archive of Cloudflare-related guides invaluable. From setting up your first domain to optimizing website performance with Cloudflare’s caching options, our comprehensive tutorials are here to assist. Don’t miss out on the wealth of knowledge we’ve compiled to help you make the most of Cloudflare’s offerings. You can explore our other guides here:
- How to Use Cloudflare for a Turbocharged Website
- Your Ultimate Guide to Cloudflare Domain Redirect
- How to Turn on The Free Cloudflare Proxy Service
- Secure your website with the Free Cloudflare Bot Fight Mode
- Secure Your Assets, with Cloudflare Hotlink Protection
- How to Instantly Purge Cloudflare Cache
- How to Set Cloudflare Browser Cache TTL
- How to Enable Cloudflare Compression to Speed Up Your Site
- How to Enable Auto Cloudflare Minify for Free Performance
- How to Use Cloudflare for a Turbocharged Website
- How to Enable the Cloudflare Block Country Feature
